
 Foundry Battle is an alliance-versus-alliance event focused on building control and Arsenal Points.
Important: Event timing, rewards, matchmaking calculations, and some interface details may change as Whiteout Survival is updated. Check the current in-game Foundry Battle panel before registration and again before entering the battlefield.
How Foundry Battle Works in Whiteout Survival
Foundry Battle places two alliances on a separate battlefield where they compete for industrial facilities. Capturing and holding these buildings generates Alliance Arsenal Points, while combat and objective participation can also contribute to a player’s personal score. The alliance with the highest Alliance Arsenal Point total when the battle ends wins. Personal points may improve individual rewards, but they do not replace the alliance score needed for victory. This distinction is important. A player can earn a high personal ranking while contributing little to the actual result if they ignore buildings, point supplies, reinforcements, and team instructions.Alliance and Player Eligibility
Under the current standard event rules, alliances ranked within the top 20 of their state’s Alliance Power Leaderboard can qualify for Foundry Battle. Eligible alliances may register up to two separate Legions.- Alliance Leaders and R4 officers manage registration.
- Each Legion can include up to 30 combatants and 10 substitutes.
- A registered member can only participate in one Legion.
- Players must join the alliance before registration closes to participate.
- Substitutes should remain available because they may be needed when registered combatants cannot attend.
Pre-entry warning: Do not wait until the battle starts to check your city. Recall marches, disable actions that could deploy troops automatically, heal your troops, and confirm your assigned Legion in advance.
If the game still blocks your entry, review the message shown on the event screen. It usually identifies the condition that must be cleared.
What Happens to Troops During Foundry Battle?
Troops are not permanently killed during Foundry Battle. Instead, combat injuries are handled within the battlefield system, and remaining event injuries are automatically recovered after the battle. However, this does not mean troop management is irrelevant. A heavily injured army becomes less useful during the match. Players who repeatedly attack without managing their troop condition may lose the ability to defend buildings or join important rallies. Leaving the battlefield can provide a recovery option, but doing so triggers a re-entry cooldown. Treat this as a tactical reset rather than your first solution. Confirm the current cooldown shown in the event interface before leaving.Foundry Battle Phases and Main Objectives
The battlefield opens in stages. New objectives become contestable as the battle progresses, forcing alliances to adjust their assignments instead of following one plan for the entire match.Phase One: Establish Early Map Control
The opening phase normally includes the following buildings:- Prototype Sites
- Repair Facilities
- Boiler Rooms
- Transit Station
Phase Two: Contest High-Impact Facilities
Later, the Imperial Foundry, Munitions Warehouse, and Mercenary Camp become available. This is usually when the strongest players and organized rally teams begin moving toward the most contested areas. The Imperial Foundry is extremely valuable because it generates a continuous stream of Arsenal Points. Nevertheless, controlling it does not automatically guarantee victory. An opponent can compensate by holding more outer buildings, collecting scattered supplies, or taking stored points when a facility changes hands.Phase Three: React to Weapon Workshops
Weapon Workshops appear at random locations during the later portion of the battle. Players can dispatch troops to collect the Arsenal Points stored inside them. These workshops reward awareness and mobility. A smaller alliance can recover from an earlier deficit if its members react faster, while a leading alliance can use them to extend its advantage. Assign mobile players to watch the map instead of expecting every building defender to abandon their post whenever a workshop appears.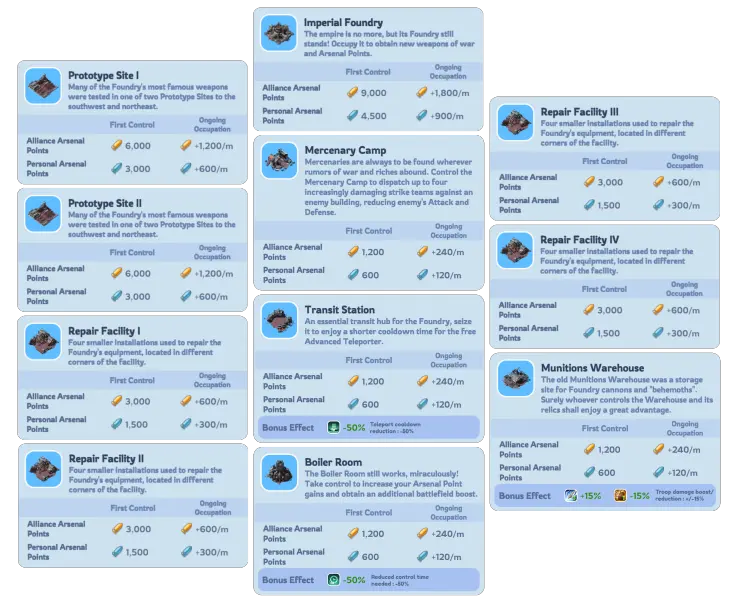
Foundry Battle Building Priorities Explained
Every facility provides a different advantage. The best target depends on the current score, your alliance’s strength, enemy positioning, and how much time remains.| Building | Main Benefit | Strategic Use |
|---|---|---|
| Prototype Site | Provides an important source of Arsenal Points. | Strong opening target that can help establish an early lead. |
| Repair Facility | Generates Arsenal Points while controlled. | Useful for steady scoring when properly defended. |
| Boiler Room | Reduces the time required to occupy buildings. | Helps an aggressive alliance retake objectives more quickly. |
| Transit Station | Accelerates teleport cooldown recovery. | Supports rapid rotations, emergency defenses, and coordinated assaults. |
| Munitions Warehouse | Improves your side’s combat effectiveness. | Valuable when both alliances are closely matched in direct combat. |
| Mercenary Camp | Allows mercenaries to attack enemy-controlled facilities. | Creates pressure without relocating an entire combat group. |
| Imperial Foundry | Produces a major continuous flow of Arsenal Points. | High-value objective that should be attacked or defended according to the score. |
| Weapon Workshop | Contains Arsenal Points that can be collected. | Requires fast map awareness and mobile marches. |
Temporary Points and Arsenal Supplies
Occupied buildings can accumulate temporary Arsenal Points. When an enemy takes the building, some of those stored points may be scattered nearby as Arsenal Supplies. These supplies appear as collectible points around the facility and can be taken by either alliance. Therefore, capturing a building is only part of the play. Your members must also be ready to collect the supplies before the opponent reaches them. This mechanic creates two important tactical rules:- Do not abandon a building with a large temporary point bank without a plan.
- When launching a coordinated capture, position mobile players nearby to collect the scattered points immediately.
Best Strategy for Foundry Battle in Whiteout Survival
The best strategy for Foundry Battle in Whiteout Survival is built around clear roles, map coverage, and fast decisions. Fixed team templates can help, but they should be adjusted to match attendance, player power, and the opponent’s behavior.1. Assign Roles Before the Battle
Every registered player should understand their main responsibility before entering. A practical Foundry roster can include:- Battle commander: Watches the score and gives the final instructions.
- Rally leaders: Lead attacks against heavily defended buildings or disruptive enemy players.
- Building holders: Occupy and reinforce assigned facilities.
- Mobile attackers: Teleport between contested areas and create pressure.
- Point collectors: Watch for Arsenal Supplies and Weapon Workshops.
- Substitutes: Remain available to replace absent or disconnected combatants.
2. Spread Out During the Opening
At the beginning of the battle, send enough strength to capture multiple facilities. Your strongest members do not always need to stack together immediately. A balanced opening often assigns strong players to contested Prototype Sites, the Transit Station, or the Boiler Room while other members secure Repair Facilities. The exact distribution should reflect the opponent’s opening movement. If the enemy concentrates on one side of the map, take advantage of the empty space instead of feeding troops into an unnecessary fight.3. Use Reinforcements Instead of Constantly Replacing Defenders
Reinforcing an occupied building can be more efficient than waiting for its defender to lose and then attempting a full recapture. It also makes it harder for enemy solo attackers to remove weaker building holders. Watch which members are being targeted repeatedly. Reinforcing an apparent weak point can turn it into a trap that damages aggressive opponents and protects the building’s stored points.4. Rotate Strong Players When Phase Two Begins
When the Imperial Foundry and other Phase Two facilities unlock, your alliance should already know which players will move and which players will remain on the outer ring. Do not empty every early building to attack the center. Instead, rotate selected rally leaders and mobile attackers while dedicated defenders maintain the alliance’s existing point income. The Munitions Warehouse may become especially valuable when your alliance needs an advantage in repeated building fights. Meanwhile, the Transit Station remains useful when frequent teleporting is required.5. Attack Point Banks, Not Just Building Names
A facility becomes a more attractive target when it contains a large amount of temporary points. Taking that building can interrupt the opponent’s income and create collectible Arsenal Supplies. Before starting a difficult rally, compare the possible point swing with the troops, healing resources, and time required. Attacking a famous objective with almost no stored value may be less useful than taking a weaker outer building with a vulnerable point bank.6. Adapt to the Current Score
Your strategy should change depending on whether your alliance is leading or trailing.- When leading: Protect point-generating buildings, reinforce vulnerable holders, and deny the opponent easy supply collections.
- When trailing: Target buildings with stored points, contest Weapon Workshops, and use coordinated rallies to create larger score swings.
- When scores are close: Prioritize fast rotations and avoid battles that do not affect an objective.
Key principle: Fight for points, not pride. Removing an enemy from an irrelevant location may improve personal statistics, but capturing a valuable facility or collecting dropped supplies is more likely to win the battle.
Preparing Your Account and Troops
Foundry Battle uses your account’s existing combat development. Research, troop tiers, Chief Gear, Hero Gear, hero skills, VIP bonuses, skins, and relevant buffs can all affect battlefield performance.Complete This Pre-Battle Checklist
- Heal all troops before the entry window.
- Recall gathering, scouting, reinforcing, and combat marches.
- Confirm your assigned Legion and battlefield time.
- Save enough healing speedups for active participation.
- Equip your strongest appropriate Chief Gear and Hero Gear.
- Activate useful combat buffs before entering.
- Prepare saved formations for rallies, garrisons, and solo attacks.
- Review alliance labels, assignments, and communication channels.
- Disable or monitor features that could send a march outside your city.
Choose Marches for Their Assigned Purpose
A rally leader, building defender, and mobile point collector do not necessarily need the same formation. Use heroes and troop compositions that suit the role your alliance has assigned. Because hero generations and account progression differ between states, there is no universal formation that is best for every player. Follow your alliance’s current rally and garrison recommendations, and compare battle reports to identify weaknesses.Comparing Different Progression Options
Players joining friends in an established state may compare normal progression with starting from a more developed account. When reviewing a wos account for sale, evaluate the state number, Furnace level, hero generation, Chief Gear, troop development, transfer eligibility, account binding, and account security rather than judging the account by displayed power alone. Foundry performance still depends on attendance, coordination, healing resources, and the ability to follow alliance instructions. Account strength cannot replace an organized team.How to Earn Personal Points Without Hurting the Alliance
Combat, building occupation, and other battlefield actions contribute to personal performance. However, players should not abandon assigned objectives only to chase attacks. A better approach is to earn personal points through actions that also help the alliance:- Attack enemies defending valuable buildings.
- Reinforce allies who are holding important objectives.
- Join coordinated rallies instead of launching random attacks.
- Collect Arsenal Supplies after a successful capture.
- Occupy facilities when your team needs a replacement defender.
- Pressure dangerous enemy rally leaders when instructed.
Common Foundry Battle Mistakes
Sending Everyone to the Imperial Foundry
The Imperial Foundry is valuable, but abandoning the rest of the map can give the opponent steady control of several other point-producing buildings.Ignoring Scattered Arsenal Supplies
Capturing a building without collecting the dropped supplies allows the enemy to recover points immediately. Assign players to collect them as part of every planned takeover.Fighting Far Away From Objectives
Random city attacks may consume troops and healing resources without changing the score. Attack enemy players when doing so protects a building, disrupts a rally leader, or supports a planned capture.Overcommitting to a Lost Position
Repeatedly attacking a heavily reinforced objective can waste the entire battle. Change targets, pressure another side of the map, or wait until the enemy divides its forces.Failing to Watch the Score
A plan that worked during the opening may become harmful near the end. Alliances must know when to defend a lead and when to take calculated risks.Leaving Without Checking the Re-entry Cooldown
Leaving can restore your fighting capability, but it also removes you from the map temporarily. Do not exit immediately before an important building unlock, workshop appearance, or final defensive push.Whiteout Survival Foundry Battle Tips
- Use map labels: Mark assignments so players can find their buildings quickly.
- Keep communication short: Use clear calls such as defend, reinforce, rally, collect, or rotate.
- Watch the minimap: Arsenal Supplies and new objectives require immediate attention.
- Protect mobile players: Point collectors and teleporting attackers may need reinforcements.
- Stagger coordinated rallies: Multiple timed attacks are harder to reinforce against than isolated rallies.
- Review battle reports: Use them to adjust heroes, formations, and target selection.
- Preserve flexibility: Keep some players uncommitted so they can answer unexpected attacks.
- Use substitutes properly: Replace missing combatants early rather than operating with an incomplete roster.
- Confirm current rewards: Foundry rewards can differ according to state progression and game updates.