
 The Frostfire Mine is a fast-paced solo event in Whiteout Survival where Chiefs compete to collect as much Orichalcum as possible. Your final total determines your milestone rewards and leaderboard position.
This Frostfire Mine guide explains how long the event lasts, its commonly available UTC times, the Frostfire skill tree, Vein Outbursts, Smelter mechanics, rewards, and practical strategies for different account strengths.
You do not need to control the center to perform well. Efficient patrol farming, careful positioning, timely skill choices, and fast reactions to Outbursts can often produce better results than repeatedly fighting stronger opponents.
The Frostfire Mine is a fast-paced solo event in Whiteout Survival where Chiefs compete to collect as much Orichalcum as possible. Your final total determines your milestone rewards and leaderboard position.
This Frostfire Mine guide explains how long the event lasts, its commonly available UTC times, the Frostfire skill tree, Vein Outbursts, Smelter mechanics, rewards, and practical strategies for different account strengths.
You do not need to control the center to perform well. Efficient patrol farming, careful positioning, timely skill choices, and fast reactions to Outbursts can often produce better results than repeatedly fighting stronger opponents.
What Is the Frostfire Mine in Whiteout Survival?
Frostfire Mine is a competitive battlefield event centered on Orichalcum collection. You earn Orichalcum by occupying Veins, defeating Mine Patrols after unlocking the appropriate skill, collecting dropped piles, gathering from Vein Outbursts, and competing for the central Smelter. The battlefield combines PvE and PvP gameplay:- PvE: Defeat Mine Guards and Mine Patrols.
- PvP: Attack Veins occupied by other Chiefs.
- Gathering: Hold regular Veins and collect temporary Outbursts.
- Territory control: Compete for Smelter occupation time during the final phase.
Important: You cannot attack another Chief’s settlement inside Frostfire Mine. However, you can attack a Vein they occupy, including one controlled by an alliance member.
How Long Is Frostfire Mine?
A Frostfire Mine battle lasts 30 minutes. There is also a short preparation period before active combat begins, allowing you to inspect the battlefield and choose a starting position. Because the active phase is brief, losing several minutes to poor positioning, inactive marches, or unnecessary battles can significantly reduce your final Orichalcum total.WOS Frostfire Mine Times
The commonly documented Frostfire Mine registration and battle slots are:- 02:00 UTC
- 05:00 UTC
- 11:00 UTC
- 14:00 UTC
- 16:00 UTC
- 18:00 UTC
- 21:00 UTC
Schedule reminder: Event slots, registration windows, and availability may change through updates or state-specific event rotations. Always confirm the exact Frostfire Mine times in your current in-game event panel.
Frostfire Mine Requirements and Battlefield Rules
Before entering the event, review these basic requirements and restrictions:- You generally need a Furnace at level 16 or higher.
- Your regular troops should be inside your settlement before entering.
- You cannot perform normal wilderness activities while participating.
- The event supplies reusable troops, so you do not suffer permanent troop losses.
- Defeated heroes normally enter a recovery period before they can fight again.
- You cannot attack another player’s Furnace or settlement.
- Technology, VIP, item, skin, and other applicable combat bonuses can remain active.
- Normal gathering bonuses do not apply to Frostfire Veins.
- Normal wilderness march-speed bonuses may not apply, but Frostfire skill bonuses do.
Understanding the Frostfire Mine Map
The map is divided into three general zones. Moving closer to the center gives access to richer Veins, but it also increases competition.
Outer Zone
The outer area contains Level 1 Veins. These Veins offer the lowest gathering rate, but they are usually easier to capture and defend. This zone is suitable for developing accounts and players who want to farm Mine Patrols without constantly fighting over the center.Middle Zone
The middle area contains Level 2 Veins. These provide a useful balance between Orichalcum output and competition. For many players, consistently holding Level 2 Veins produces better results than repeatedly losing heroes while contesting Level 3 Veins.Central Zone
The central area contains Level 3 Veins and the Smelter. It offers the highest regular gathering rate but usually attracts the strongest players in the match. Do not move into the central zone only because its Veins have higher numbers. First consider whether you can hold those positions long enough to benefit.Frostfire Mine Veins and Gathering Rates
Regular Veins are the most consistent source of Orichalcum. Higher-level Veins have proportionally larger capacities and faster gathering rates.| Vein Type | Capacity | Base Rate | Approximate Base Drain Time |
|---|---|---|---|
| Level 1 Vein | 8,640 | 8 per second | 18 minutes |
| Level 2 Vein | 17,280 | 16 per second | 18 minutes |
| Level 3 Vein | 34,560 | 32 per second | 18 minutes |
| Vein Outburst | 4,000 | 200 per second | About 20 seconds |
Mine Guards and Orichalcum Piles
Regular Veins are initially protected by Phaethon Mine Guards. Defeating the guards allows you to occupy the Vein and can produce nearby Orichalcum piles. These piles are easy to overlook. Send a squad to collect them while your regular marches continue hunting patrols or occupying other targets. The special collection dispatch does not necessarily consume a normal march queue in the same way as standard movement.Attacking Occupied Veins
You can attack a Vein controlled by another Chief. If you win, you take the gathering position. Under certain conditions, part of the defeated player’s accumulated yield may also appear as collectible Orichalcum nearby. A failed attack can be expensive even without permanent troop losses. The heroes used in the defeated march normally become unavailable for several minutes. For that reason, avoid repeatedly attacking a stronger opponent unless the target is strategically important.Vein Outburst Timing and Strategy
Vein Outbursts are temporary, high-yield gathering targets. Each commonly documented Outburst contains approximately 4,000 Orichalcum and can be emptied in about 20 seconds at its base rate. The main Outburst windows commonly occur around:- Minutes 8, 9, and 10 after the battle starts.
- Minutes 18, 19, and 20 after the battle starts.
Outburst strategy: Keep at least one march ready before each spawn window. When the warning appears, pause low-value activities, reposition if necessary, and send several marches toward different Outbursts instead of stacking everything on one target.
How the Frostfire Mine Smelter Works
The Smelter is located in the center of the battlefield. It opens during the final stage, at approximately 23 minutes after the battle begins, or when the timer shows around 7 minutes and 30 seconds remaining. Smelter bonuses are based on occupation time. Players who hold it longer can receive larger amounts of bonus Orichalcum at the end of the match. However, the Smelter is not automatically the best target for every player. Consider the opportunity cost:- Strong accounts may benefit from fighting for a high occupation rank.
- Mid-strength accounts can attempt short occupations when the building changes hands.
- Developing accounts may earn more by farming patrols, Outbursts, and uncontested Veins.
Common mistake: Spending the entire final phase attacking the Smelter without winning a meaningful occupation period can produce fewer points than continuing your existing patrol and gathering cycle.
Frostfire Mine Skill Tree Explained
Defeating Mine Patrols grants Frostfire XP. You spend that XP to unlock five skill tiers, with a choice between a left and right branch at each tier. Your choices normally remain locked for the current battle, so select each skill carefully.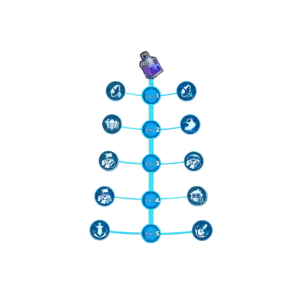
| Tier | XP Cost | Left Branch | Right Branch |
|---|---|---|---|
| 1 | 200 XP | Generates approximately 1,080 additional Orichalcum per minute. | Awards approximately 1,500 Orichalcum for each defeated Mine Patrol. |
| 2 | 500 XP | Increases the number of troops that can be dispatched in one march. | Increases battlefield march speed by approximately 25%. |
| 3 | 900 XP | Awards Orichalcum when you successfully occupy a common Vein, with a cooldown. | Awards Orichalcum after failing to occupy a common Vein, with a cooldown. |
| 4 | 1,500 XP | Improves Orichalcum gathering efficiency while occupying a Vein. | Reduces hero recovery time after a defeat. |
| 5 | 2,300 XP | Temporarily increases troop damage for marches deployed while the skill is active. | Temporarily increases gathering speed for marches deployed while the skill is active. |
Do not confuse the numbers: The XP costs shown above are skill unlock requirements. They are not necessarily the amount of XP awarded by an individual patrol. Patrol XP can depend on patrol level or later event adjustments, so check the value displayed in your current event.
Best Frostfire Mine Skill Tree for Patrol Farming
For many active players, the most practical general-purpose path is:- Tier 1: Right – Gain Orichalcum from patrol defeats.
- Tier 2: Right – Move between patrols and Outbursts faster.
- Tier 3: Left – Gain a periodic bonus when occupying a common Vein.
- Tier 4: Left – Improve gathering efficiency.
- Tier 5: Right – Activate the gathering boost before high-value collection periods.
Alternative Combat Skill Path
Players planning to contest the Smelter or attack heavily defended Level 3 Veins may prefer combat-focused choices at Tiers 4 and 5:- Choose the hero recovery reduction if you expect repeated defeats.
- Choose the temporary troop-damage skill if you can realistically win central battles.
Step-by-Step Frostfire Mine Strategy
1. Prepare Your March Presets
Create your formations before the battle starts. You should have:- A strong march for guards and contested Veins.
- Fast patrol-farming marches.
- A gathering or occupation march.
- An optional Smelter-focused combat march.
2. Choose a Low-Congestion Starting Area
During preparation, inspect the map and player distribution. Look for an area with several Mine Patrols and nearby Level 1 or Level 2 Veins. The center is not always the best starting location. A slightly quieter area can provide more uninterrupted patrol kills and fewer hero recovery penalties.3. Farm Patrols Immediately
Use several marches to defeat nearby patrols. Unlock the first skill as quickly as possible and choose the patrol-reward branch when following the general farming strategy. Continue moving between patrols until you have unlocked your key early skills. Do not leave marches idle on low-value targets during this phase.4. Trigger the Tier 3 Occupation Bonus
After selecting the Tier 3 left skill, occupy a common Vein whenever its bonus becomes available. This creates an additional scoring cycle alongside patrol farming. You do not always need to remain on the Vein until it is empty. Decide whether holding it is worthwhile based on the gathering rate and nearby competition.5. Prepare for Both Outburst Windows
Watch the event timer and warning banners. Before the first and second Outburst windows:- Recall at least one march if all marches are occupied.
- Position near an area with several potential spawns.
- Avoid starting a long or unnecessary attack.
- Use the free battlefield teleporter if your current area is depleted.
6. Reassess Before the Smelter Opens
When the event approaches its final 7 minutes and 30 seconds, decide whether the Smelter matches your account strength. Check which players are already moving toward the center. If several significantly stronger Chiefs are preparing to fight, continue farming patrols and exposed Veins instead.7. Stay Active Until the Timer Ends
Do not stop after the final Outburst or a failed Smelter attempt. Patrols, unguarded Veins, dropped Orichalcum, and short occupation opportunities can still improve your final rank.Frostfire Mine Strategy by Account Strength
Developing Accounts
Focus on Level 1 and Level 2 Veins, Mine Patrols, and Outbursts. Avoid repeatedly attacking central positions where defeats will lock your heroes. Your objective should be consistent activity, not controlling the most valuable building.Mid-Strength Accounts
Use Level 2 Veins as your base strategy while watching for exposed Level 3 Veins. Contest high-value targets only when the defending player appears manageable. You may also gain short Smelter occupation periods when stronger players are fighting elsewhere, but do not become trapped in an endless attack cycle.Strong and Competitive Accounts
Strong accounts can pressure Level 3 Veins, control productive areas, and compete for Smelter occupation time. Even then, efficient patrol farming and Outburst collection remain important. Combat strength alone will not guarantee a top rank if marches remain idle or high-yield temporary targets are ignored. Players joining friends in an established state sometimes compare different progression options. Before considering a wos account for sale, review the state number, Furnace level, heroes, Chief Gear, Expert progression, transfer eligibility, account binding, and account security. These details can affect Frostfire performance more than the displayed total power alone.Kathy and Frostfire Mine Expert Bonuses
If the Expert system and Kathy are available in your state or account progression, her bonuses can improve Frostfire Mine performance. Depending on her skill and affinity levels, Kathy can provide benefits connected to:- Additional XP from defeating Mine Patrols.
- Higher troop deployment capacity.
- Shorter hero recovery periods.
- Additional Frostfire-related Charm rewards.
- Passive Orichalcum generation during the event.
- Extra troop health and lethality in Frostfire battles.
Frostfire Mine Rewards
Frostfire Mine rewards generally come from two systems.Gathering Milestone Rewards
These rewards unlock when your total collected Orichalcum reaches specific thresholds. Even if you cannot place near the top of the leaderboard, completing personal milestones can still make the event worthwhile.Leaderboard Rewards
Ranking rewards depend on your final position relative to other players in the match. Higher placements usually provide more valuable quantities or additional items. Available rewards may include:- Charm Guides.
- Charm Designs.
- Gems.
- Speedups.
- Resource items.
- Event-specific cosmetic or ranking rewards.
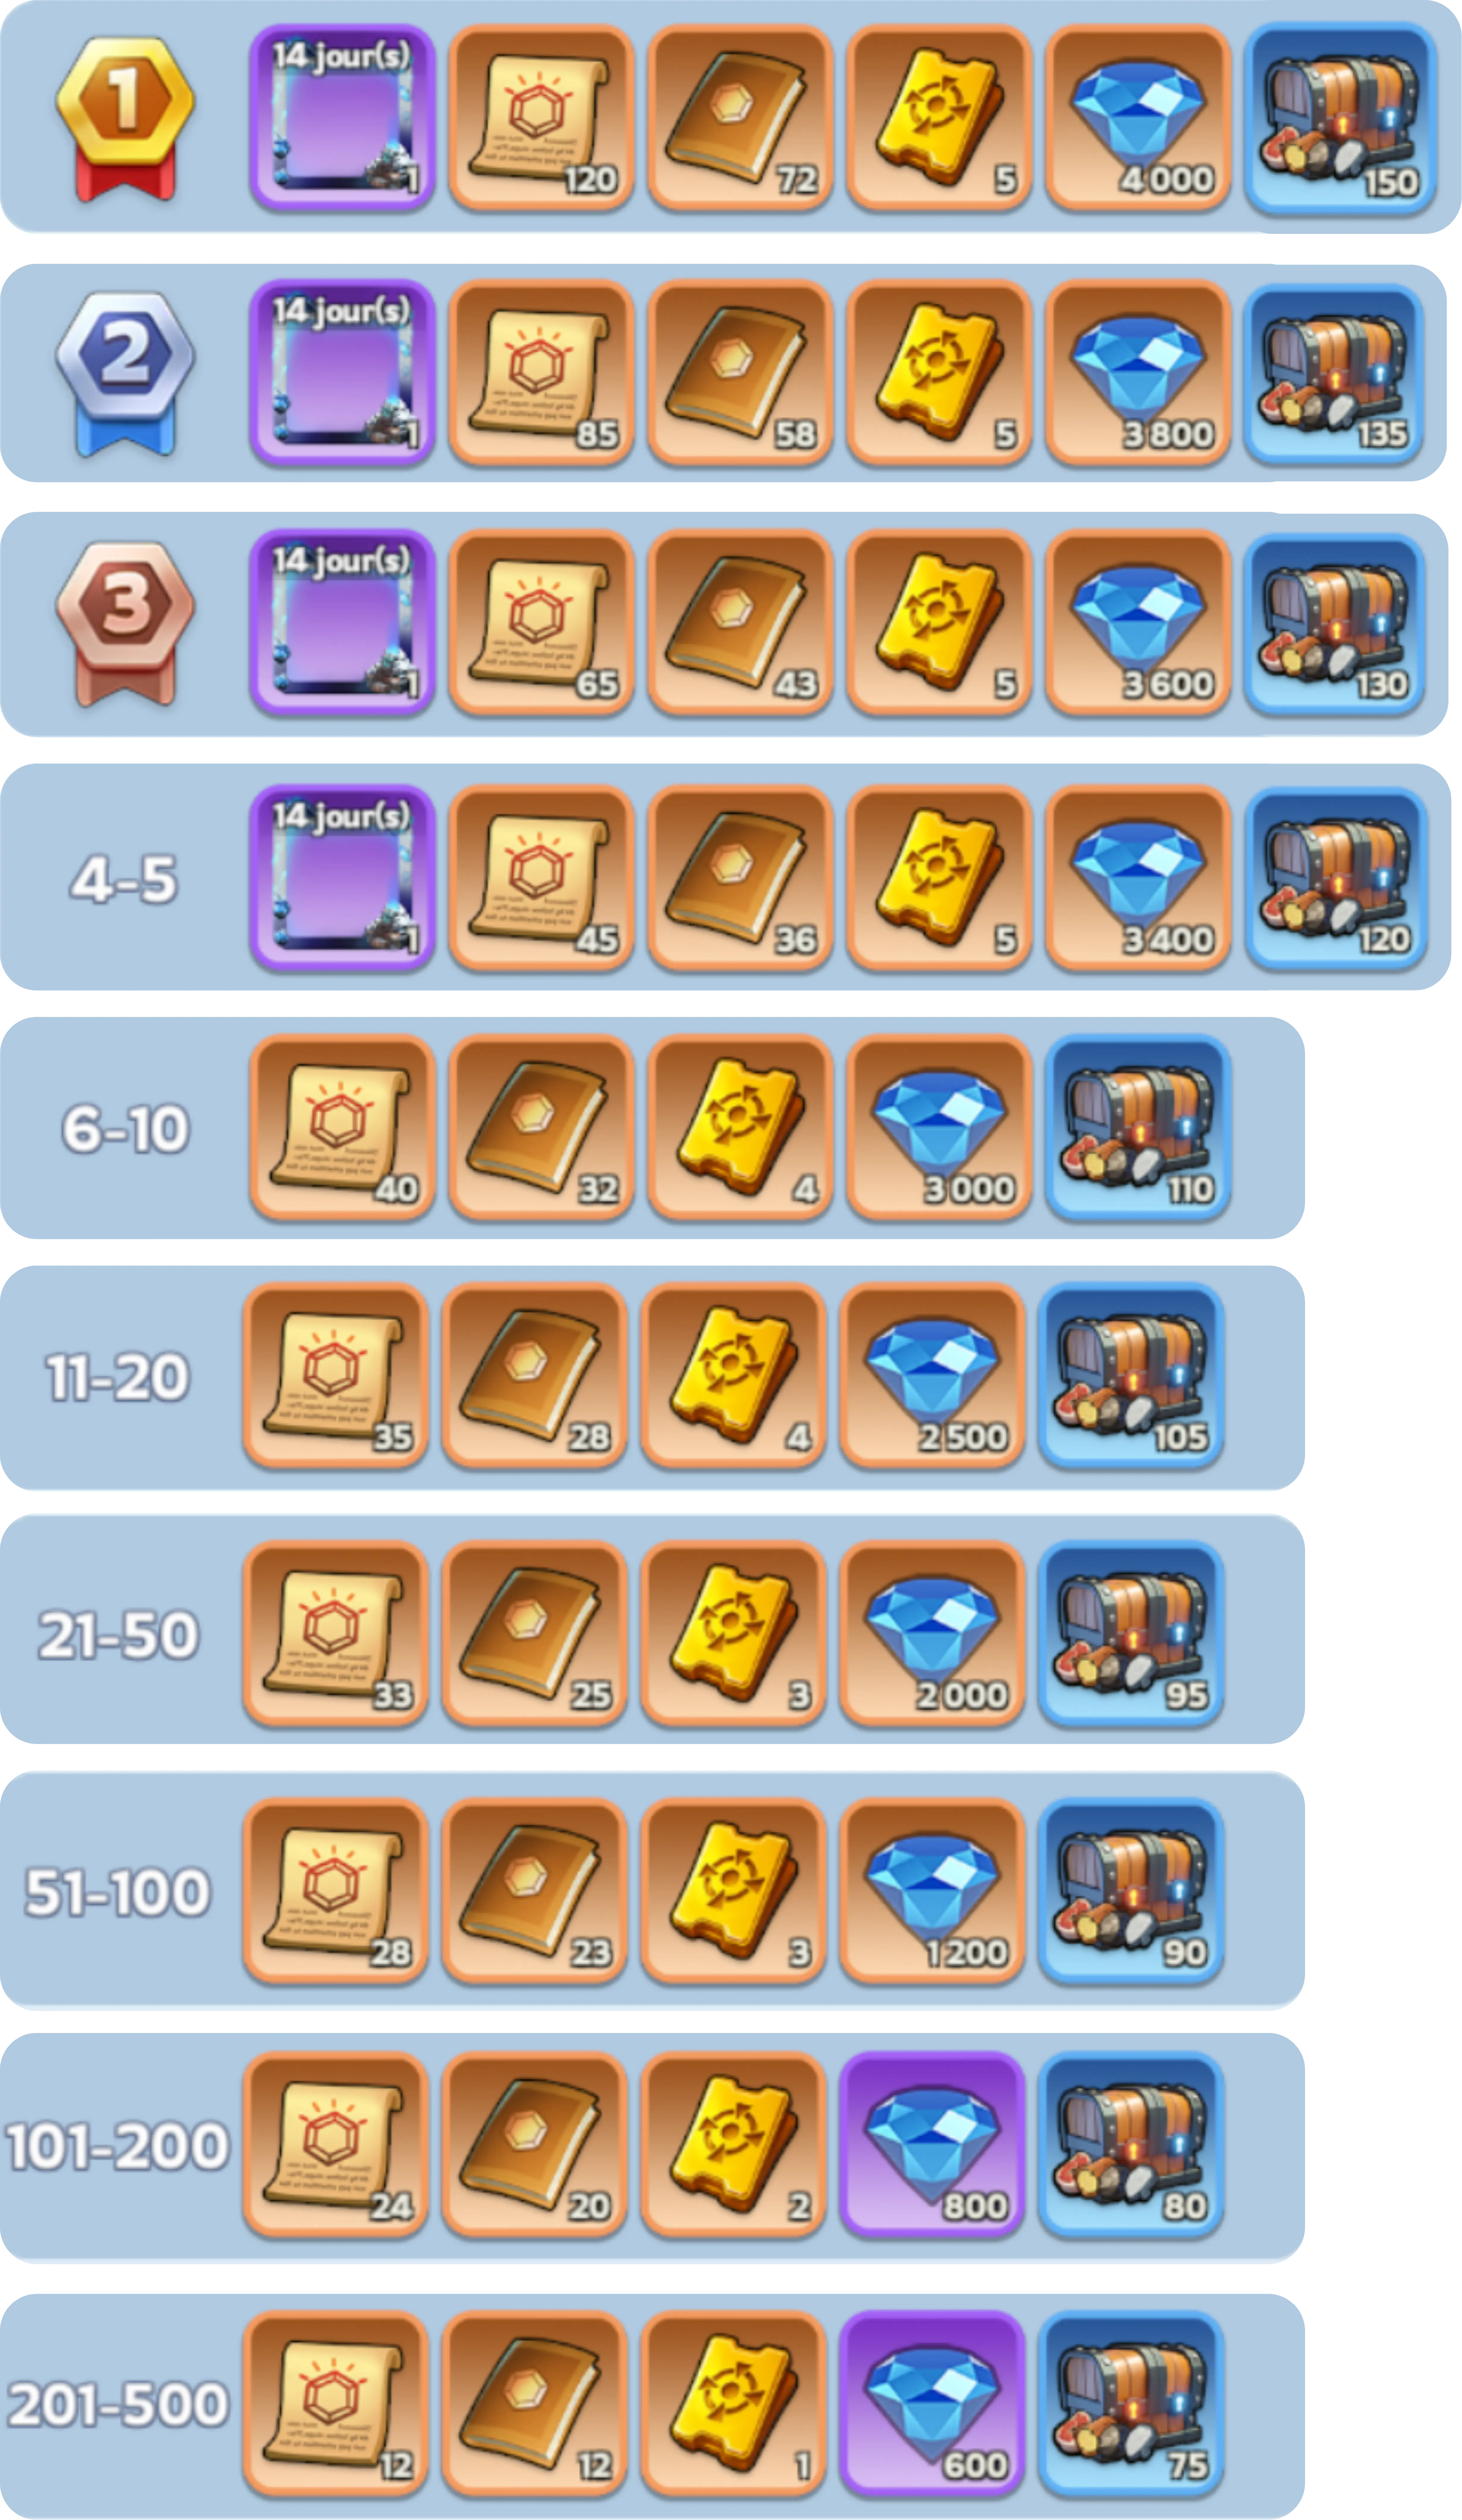
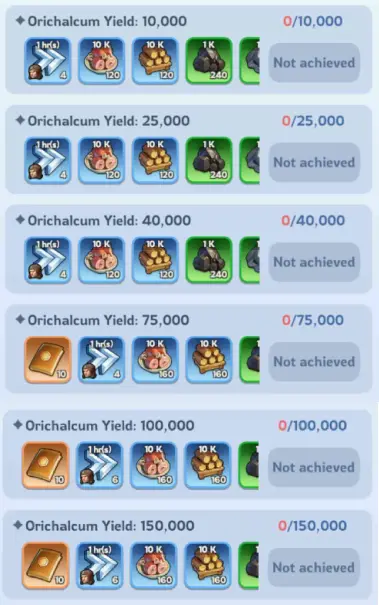
Reward reminder: Milestone requirements, item quantities, and leaderboard rewards may change according to event adjustments or state progression. Check the reward preview in the active event panel before planning around a specific item.
Common Frostfire Mine Mistakes
- Sending every march to a regular Vein: This leaves no march available for patrols or Outbursts.
- Ignoring Orichalcum piles: Small missed collections add up over the full event.
- Choosing skills too quickly: Skill choices normally cannot be reset during the current match.
- Fighting stronger players repeatedly: Hero recovery time can remove important marches from the battlefield.
- Moving to the center too early: Richer Veins are not useful if you cannot hold them.
- Missing Outburst warnings: Outbursts offer far more Orichalcum per second than regular Veins.
- Using every teleport immediately: Save repositioning options for depleted areas and Outburst windows.
- Forcing the Smelter: The central objective is optional, especially for developing accounts.
- Leaving the event early: Late patrols, Veins, and dropped Orichalcum can still change your rank.