
Desert Storm is an alliance-versus-alliance battlefield event in Last War: Survival where victory comes from controlling objectives, earning Battlefield Points, and coordinating your team more effectively than the opposing alliance. Raw squad power helps, but positioning, building assignments, timing, and communication can decide close matches.
This Last War Desert Storm guide covers registration, scoring, building priorities, battle phases, team roles, substitutes, and practical strategies for both alliance leaders and regular participants.
Desert Storm is won by Battlefield Points, not simply by defeating the most enemy squads. Fighting should support control of valuable objectives rather than becoming the alliance’s only focus.
How Desert Storm Works
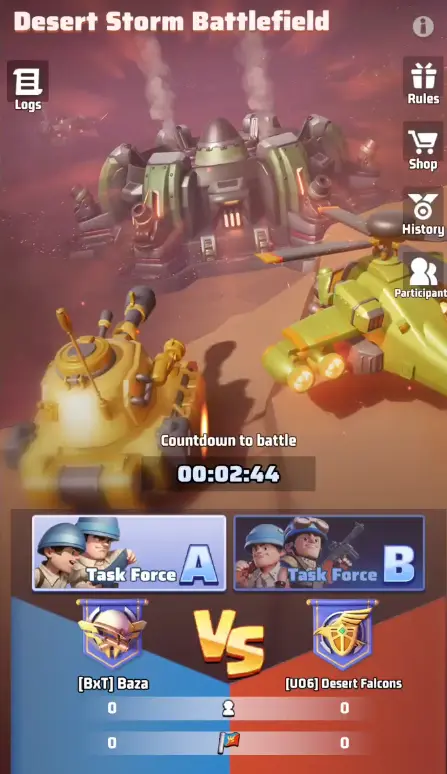
Two alliances enter a separate battlefield and compete for control of strategic buildings. Holding these locations generates Battlefield Points, while some buildings also provide bonuses that improve mobility, recovery, combat strength, or objective control.
Players can also earn Individual Points during the battle. These are separate from the alliance’s Battlefield Points and are used for personal reward progression.
The main objectives are therefore:
- Earn more Battlefield Points than the opposing alliance to win the match.
- Build Individual Points through participation, objective control, and combat.
- Protect valuable buildings while attacking objectives that can meaningfully change the score.
Troops used inside Desert Storm are not permanently lost outside the event. However, battlefield losses still reduce your available fighting strength during the match, making troop recovery and Field Hospital control important.
Desert Storm Registration and Participation
Desert Storm follows a registration and matchmaking schedule before the battle begins. Current event rules include several eligibility requirements:
- The alliance must qualify within the required Warzone alliance rankings.
- The alliance must have existed for at least seven days.
- Participating players need a sufficiently developed base, with Level 15 listed as the minimum requirement in current event information.
- Players must be selected for a participating Task Force.
- A player can participate in only one Task Force.
Registration normally takes place earlier in the week, followed by matchmaking and the actual battle. R4 and R5 officers handle Task Force registration, battle-time selection, and participant selection.
Task Force A and Task Force B
An alliance can organize Task Force A and Task Force B as separate battle groups. Each Task Force can contain up to 20 starting participants and 10 substitutes.
The two Task Forces are handled separately, including their participant lists and battles. Alliances without enough reliable participants should prioritize building one organized team instead of spreading active players too thin.
Submitting a request to participate does not guarantee a battle position. R4 and R5 officers still need to place the player into the starting lineup or substitute roster.
Desert Storm Battle Phases
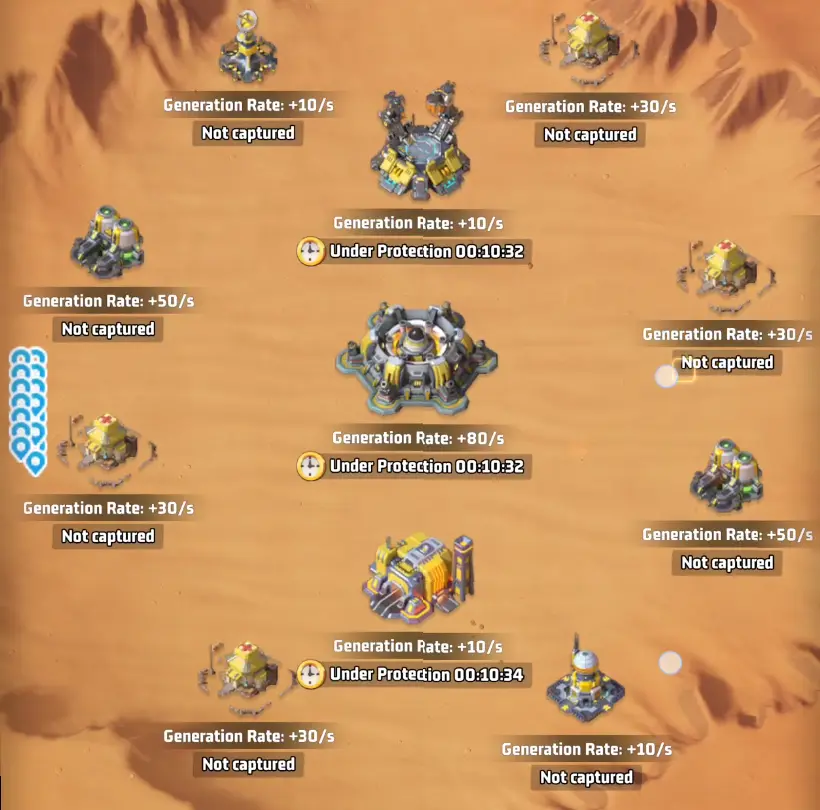
The battle itself lasts 30 minutes, preceded by a short preparation period. Different objectives become available as the match progresses.
| Phase | Main Objectives | Recommended Focus |
|---|---|---|
| Preparation | Enter battlefield and organize squads | Confirm roles, defense, routes, and starting assignments |
| Stage 1 | Oil Refineries, Field Hospitals, Info Center, Science Hub | Establish early point income and battlefield control |
| Stage 2 | Nuclear Silo, Arsenal, Mercenary Factory | Contest the center and protect high-value objectives |
| Stage 3 | Oil Wells and remaining objectives | Gather supplemental points without abandoning critical buildings |
| Endgame | All available objectives | Protect the lead or attack locations capable of swinging the score |
The Nuclear Silo, Arsenal, and Mercenary Factory become available after the opening portion of the battle. Oil Wells appear later and provide another way to generate points.
Desert Storm has received adjustments over time, and some older versions of the event list different bonuses or Stage 3 timing. Check the current in-game building descriptions and battlefield timer when they differ from older strategies.
Desert Storm Building Priority
Every structure has value, but they should not receive equal attention. The best target depends on your current score, troop strength, and what the enemy is doing.
Nuclear Silo

The Nuclear Silo is the central high-value objective and becomes available during Stage 2. It generates a large amount of Battlefield Points, making prolonged control extremely valuable.
Your alliance should prepare for the Silo before it unlocks instead of reacting after the enemy has already established control. Strong frontline players should be positioned to attack, reinforce, or counterattack around the center.
Oil Refineries

The two Oil Refineries are major early-game point objectives and are available from the start of the battle. They should normally receive immediate assignments.
A refinery that remains uncontested can build a significant early advantage. However, committing too many players to one refinery may allow the enemy to capture several other objectives for free.
Field Hospitals

There are multiple Field Hospitals across the battlefield. Holding them supports troop recovery, helping your alliance sustain repeated battles rather than gradually losing its ability to contest objectives.
Hospitals become particularly valuable during prolonged fights between similarly matched alliances. Make sure players also collect available recovered units rather than ignoring the hospital system.
Science Hub

The Science Hub improves battlefield mobility by reducing the cooldown of the free teleport. Faster relocation makes it easier to reinforce threatened objectives, respond to enemy pushes, and move between different sections of the battlefield.
This building is especially valuable for alliances using coordinated rotations instead of leaving every player permanently assigned to one position.
Info Center

The Info Center is a strategic utility objective. Current versions list a bonus that improves building capture speed, allowing an alliance to secure contested structures more quickly.
Because this mechanic has differed between event versions, commanders should verify the current tooltip before the battle and adjust its priority accordingly.
Arsenal

The Arsenal becomes available with the Stage 2 objectives and provides combat bonuses to your heroes. It can improve your ability to win building fights and hold heavily contested positions.
Its value increases when both teams are closely matched and repeated direct battles are deciding ownership of the center.
Mercenary Factory

The Mercenary Factory applies a combat disadvantage to the opposing side. Like the Arsenal, it can shift difficult fights in your favor.
However, neither combat-bonus building should distract your strongest players from the Nuclear Silo if control of the Silo is determining the match.
Oil Wells

Oil Wells become available later and can be gathered for additional Battlefield and Individual Points. They are useful for spare squads, players with reduced fighting strength, or situations where the major objectives are already secure.
Do not send critical defenders away from a Nuclear Silo or Refinery fight merely to gather a small amount of additional points.
Point Supply Boxes and Plunderable Points

Building control has another strategic layer: some points accumulated at captured buildings can become vulnerable to plundering. When ownership changes, Point Supply Boxes can appear on the battlefield.
These boxes can be collected using reconnaissance aircraft and can transfer valuable points into your alliance score.
This creates two reasons to attack an enemy-held building:
- Stop the opponent from continuing to generate points.
- Create an opportunity to recover points through Supply Boxes after taking control.
Commanders should therefore watch enemy objectives that have been held for a long time. Capturing an established position can be much more valuable than repeatedly attacking a recently captured low-priority building.
Best Desert Storm Strategy
1. Assign Players Before the Match
Do not begin Desert Storm with all 20 players waiting for instructions. Divide the roster into groups before entering the battlefield.
A practical structure can include:
- Objective teams assigned to Refineries and other starting structures.
- Heavy hitters prepared for the Nuclear Silo and difficult defenses.
- Mobile support players who reinforce weak positions or attack poorly defended objectives.
- Reserve or substitute players ready to replace commanders who leave the battlefield.
Exact team sizes should depend on the strength distribution within your alliance rather than following a rigid template.
2. Spread Out at the Opening
Sending nearly every player to one objective is one of the easiest ways to lose the opening phase. Even if your alliance captures that location quickly, the opponent may take several uncontested structures.
Secure the major point generators while maintaining enough presence across the map to prevent easy enemy captures.
3. Prepare for the Nuclear Silo in Advance
Do not wait until the Silo opens before deciding who should attack it. Players assigned to the central battle should already be ready to move as Stage 2 approaches.
The first team to establish strong control can force the opponent to spend significant time and troops trying to dislodge it.
4. Use Mobile Players to Create Pressure
Not every player needs to remain on the most heavily contested building. Mobile squads can attack lightly defended structures, reinforce threatened locations, and force the opposing alliance to split its attention.
This is often more useful than repeatedly sending weaker squads directly into the enemy’s strongest position.
5. Defend the Score, Not Just the Map
Owning more buildings does not automatically mean you are making the best strategic decision. Prioritize objectives that generate meaningful points or provide bonuses your team currently needs.
If you already have the lead late in the match, defending high-value locations can be safer than launching unnecessary attacks that weaken your existing positions.
Keep one or more flexible players available instead of assigning every commander permanently. A mobile response group can reinforce a weakening Silo, retake a Refinery, or exploit an undefended enemy objective.
How to Earn More Individual Points
Winning the alliance battle should remain the priority, but players also need Individual Points for personal rewards.
Useful ways to increase your contribution include:
- Participating in building captures.
- Holding objectives that generate Individual Points.
- Fighting enemy troops around important buildings.
- Gathering from Oil Wells when your squads are not required elsewhere.
Avoid chasing personal combat points when it actively harms the alliance strategy. Fighting random enemies far away from important objectives may increase activity without helping your team win.
Substitutes and Player Rotation
Only a limited number of players can be active on the battlefield at the same time. Starting participants can enter during the preparation phase, while substitutes can join after the battle begins when a slot is available.
If an active player has exhausted most of their fighting capability or needs to leave, properly leaving the battlefield allows a substitute to take the open position.
This makes substitutes useful rather than merely emergency backups. Organized alliances can use them to maintain activity throughout the full battle.
Common Desert Storm Mistakes
- Everyone attacking the same building: this leaves too much of the battlefield uncontested.
- Ignoring Field Hospitals: sustained recovery becomes increasingly important during long fights.
- Arriving late for Stage 2: the enemy may establish Nuclear Silo control before your main force arrives.
- Ignoring Supply Boxes: valuable points can remain available after objectives change ownership.
- Using teleports without a plan: mobility is most useful when responding to an important objective.
- Overcommitting to combat: defeating enemy squads is useful only when it supports scoring and map control.
- Poor communication: several strong players acting independently can perform worse than a coordinated team with clear assignments.
Strengthen Your Last War Account
Desert Storm becomes easier to manage when your account has strong, well-developed squads that can hold objectives and respond to difficult fights. Players who prefer to start with an established account can browse Last War accounts for sale on Heaven Guardian.
FAQs
How long does Desert Storm last?
The active Desert Storm battle lasts 30 minutes, with a short preparation period before combat begins.
Do you permanently lose troops in Desert Storm?
No. Troops used in the event are not permanently lost from your normal account. Battlefield casualties can still reduce your available forces during the match, so healing and troop management remain important.
What is the most important Desert Storm building?
The Nuclear Silo is generally the most important single point objective after it becomes available. Oil Refineries are particularly important during the opening stage, while Field Hospitals and utility buildings can provide advantages that help maintain control.
Should everyone fight at the Nuclear Silo?
No. The Silo deserves significant attention, but abandoning every other objective allows the opponent to accumulate points elsewhere. Strong players should contest the center while other groups defend Refineries, Hospitals, and strategic utility buildings.
Are Individual Points and Battlefield Points the same?
No. Battlefield Points determine the alliance battle result, while Individual Points determine personal reward progress. Many activities contribute to both, but players should avoid sacrificing the alliance’s objectives simply to increase their individual score.
What should weaker players do in Desert Storm?
Lower-power participants can still contribute by reinforcing objectives, capturing lightly defended locations, gathering from Oil Wells, collecting available Supply Boxes, and responding to commander instructions. Desert Storm rewards coordinated participation rather than only individual combat strength.
Conclusion
The best Desert Storm strategy in Last War is built around coordinated objective control. Capture valuable early buildings, maintain enough Field Hospital access to sustain your team, prepare for the Nuclear Silo before Stage 2 begins, and use mobile players to reinforce or pressure weak areas of the map.
Strong alliances also separate Battlefield Points from personal scoring priorities. Winning comes from controlling the locations that matter at the right time, not simply fighting as often as possible. Because individual building bonuses and stage details may change between event versions, always verify the current in-game descriptions before finalizing your battle plan.
For more event strategies, progression advice, and gameplay guides, visit our additional Last War guides.