

Tri-Alliance Clash is a recurring Kingshot alliance battlefield in which three alliances compete for points during a 60-minute match. It is not primarily a kill event. The most reliable path to victory is to control scoring buildings, preserve connected routes, manage Energy carefully, and move as a legion when Garrisons and the Temple of Tides become available.
Assign every player before entry, secure lane anchors and Transit Centers early, contest Garrisons from minute 20, and begin the Temple regroup before minute 40. Random fighting usually costs more Energy and map control than it earns.
What Is Tri-Alliance Clash in Kingshot?
Tri-Alliance Clash runs on a monthly cycle in eligible kingdoms. The event week moves from voting to sign-up, matchmaking, and a Saturday battle. An alliance can organize two separate legions, and each legion can use a different battle slot and receive a separate reward calculation.
| Event Detail | How It Works |
|---|---|
| Match format | Three alliances compete on one battlefield |
| Battle length | 60 minutes |
| Legions | Up to two per alliance |
| Roster size | Up to 30 combatants and 10 substitutes for each legion |
| Player deployment | Up to three squads per participant |
| Victory condition | Finish with the highest total score |
Alliance eligibility normally includes a top-20 position on the kingdom Alliance Power Leaderboard, while a legion needs at least 15 total combatants and substitutes to enter matchmaking. Other personal or second-legion requirements may depend on the current event version and kingdom progression, so officers should confirm the live deployment screen before finalizing the roster.
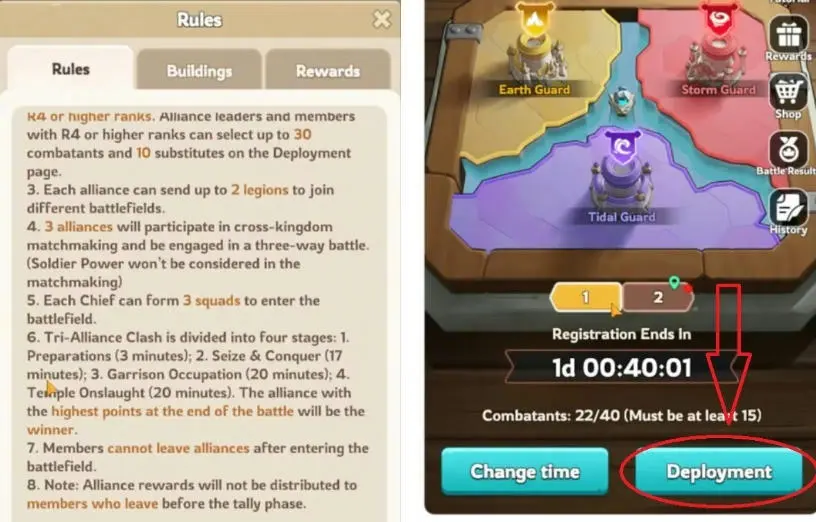
Tri-Alliance Clash Schedule and Battle Phases
The week-long setup matters because the three-minute Preparation phase is only long enough to repeat a plan, not create one.
| Timing | Phase | Main Objective |
|---|---|---|
| Monday–Tuesday | Voting | Collect availability and choose a suitable Saturday time slot |
| Wednesday–Thursday | Sign-Up | Build the legions, select substitutes, and assign roles |
| Friday | Matchmaking | Review the matchup and publish the final route plan |
| Battle minutes 0–3 | Preparation | Place marks and confirm assignments |
| Battle minutes 3–20 | Seize & Conquer | Capture early buildings, lane anchors, and mobility routes |
| Battle minutes 20–40 | Garrison Occupation | Secure Garrisons while keeping lanes stable |
| Battle minutes 40–60 | Temple Onslaught | Contest the Temple of Tides and protect the routes feeding it |
How Scoring and Map Control Work
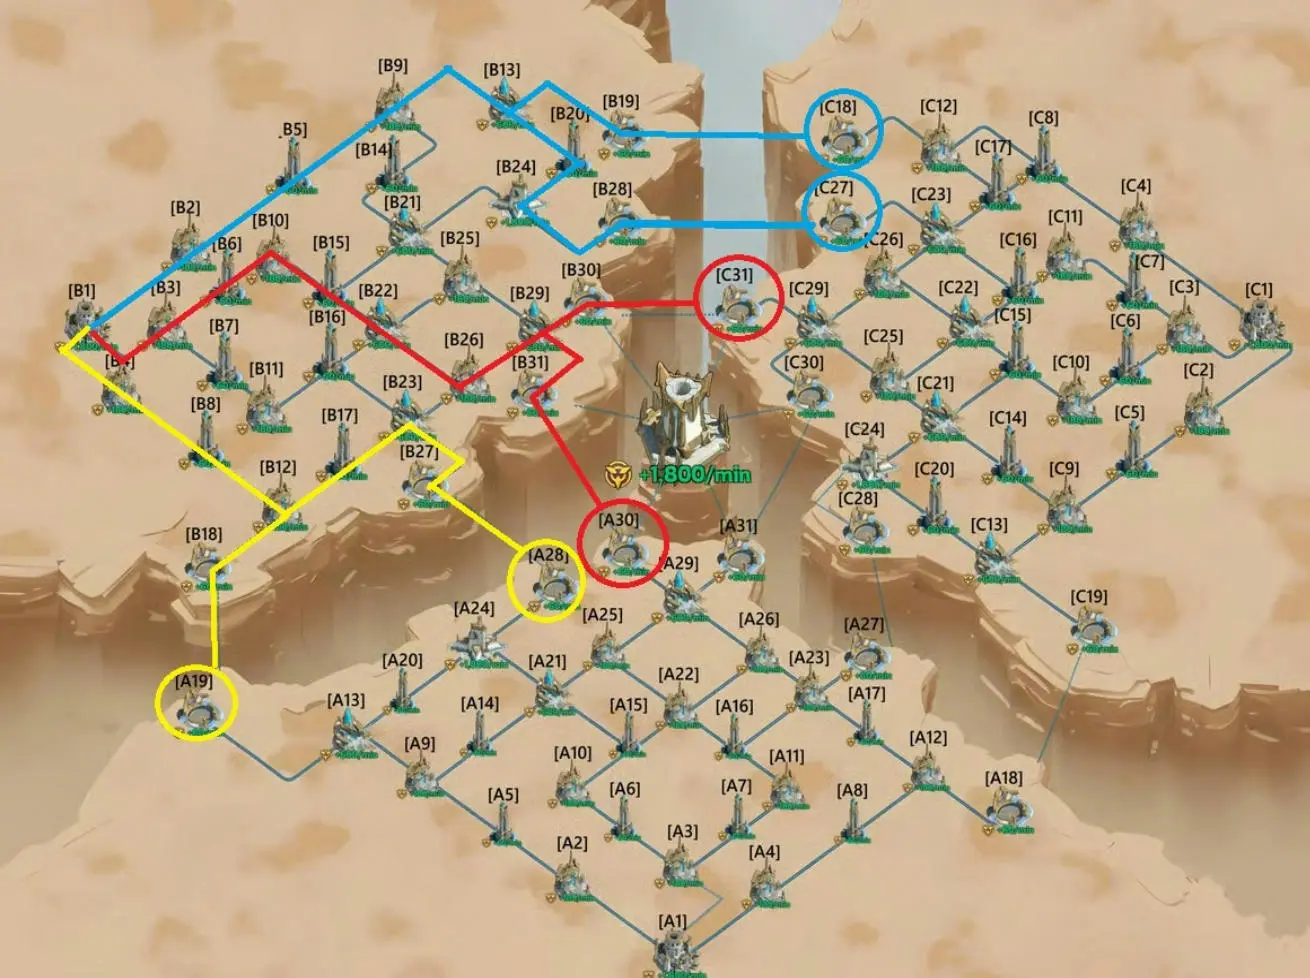
Buildings create the score. Kills are useful only when they clear a route, remove defenders from an objective, or protect a scoring position. A legion that wins many isolated fights can still lose if it gives up structures and arrives late to the major phase transitions.
| Building | Point Value | Strategic Use |
|---|---|---|
| Temple of Tides | 1,800 points per minute after opening | Final central objective with an additional high-impact bonus condition |
| Garrison | 1,800 points per minute | Major mid-game objective that opens at minute 20 |
| Ruin Cluster | 600 points per minute | Strong passive score and useful route control |
| Ruins | 180 points per minute | Steady scoring along the lanes |
| Pillar | 60 points per minute | Low direct score but can help preserve a route |
| Transit Center | 60 points per minute | Provides important battlefield mobility and central access |
| Headquarters or Bastion | No passive points | Starting and revival location |
Do not judge a building only by its points per minute. A Transit Center or connector may be more valuable than a higher-scoring side structure if losing it blocks reinforcements from reaching a Garrison or the Temple. Route continuity is therefore both a mobility advantage and a scoring advantage.
The Temple’s extra bonus condition has appeared differently across event versions. Before battle, verify the live rule panel and tell the legion whether the current bonus depends on first capture, end-of-battle occupation, or another condition. Sustained Temple control remains valuable because it generates points throughout the final phase.
Best Alliance Role Setup
A full legion should be divided by responsibility rather than raw power alone. One workable 30-player structure uses six lane anchors, 12 supporters, six strike-team players, and six reaction players. The exact numbers can be adjusted for attendance and matchup strength, but every route still needs an owner.
| Role | Primary Job | Best Player Profile |
|---|---|---|
| Lead and backup caller | Set the objective, route, and timing for each phase | Calm players with strong map awareness and reliable attendance |
| Lane anchors | Capture the first key position, hold the frontline, and preserve the lane | Strong, dependable fighters who will not abandon assignments |
| Supporters | Hold the building behind an anchor, cover healing rotations, and prevent a route collapse | Responsive players who value stability over chasing fights |
| Strike team | Move as one group through weak routes, pressure backline structures, and force enemy rotations | Coordinated players with enough strength and Energy to keep moving |
| Reaction teams | Capture neutral central buildings, reinforce threatened lanes, and retake lost connectors | Fast responders who wait for a call instead of freelancing |
| Captains | Use important occupied buildings to improve Energy recovery and support repeated movement | Active players who will remain stationed where the bonus is needed |
Use reliable players for support, reaction, captain, and caller duties. A lower-power member who stays on assignment can preserve more scoring time than a stronger member who leaves a lane for an unrelated fight.
Phase-by-Phase Winning Strategy
Phase 1: Preparation, Minutes 0–3
Enter with the plan already written. Officers should place map marks, repeat the opening route, confirm the lead caller, and remind everyone of the minute-20 and minute-40 transitions. Players should have three squad presets ready before entering.
- Confirm each lane anchor and the supporters assigned behind that player.
- Identify the reaction teams’ opening neutral targets.
- Mark the first Transit Centers and route buildings.
- Set the Garrison priority and Temple regroup location.
- Keep calls short enough to follow during movement.
Phase 2: Seize & Conquer, Minutes 3–20
The opening phase establishes the routes used for the rest of the battle. Lane anchors should move directly to their assigned key positions, while supporters secure the building behind them. Reaction teams can take uncovered central structures after the main routes are stable.
Use a healing rotation instead of allowing the anchor to be defeated. One supporter steps forward, the weakened anchor retreats to recover, and the anchor returns as soon as possible. This keeps the lane occupied and avoids a long march back from Headquarters.
- Prioritize connected structures and Transit Centers over distant fights.
- Do not push deeper than supporters can safely follow.
- Keep the strike team together when exploiting an open lane.
- Spend Energy on map position, not on repeated kill chasing.
- Report pressure early so reaction players can move before a lane collapses.
Phase 3: Garrison Occupation, Minutes 20–40
Garrisons become available at minute 20 and immediately create major point pressure. Protecting your own Garrison is the first responsibility. An attack on an enemy Garrison should be a coordinated legion action, not a stream of isolated squads.
The strike team should target a weak approach or undefended backline building, while reaction teams cover whichever lane is under the heaviest pressure. Do not remove every defender from lane anchors to chase a Garrison; losing the route can prevent reinforcements from returning.
- Station a stable defense on your Garrison.
- Time offensive arrivals so multiple squads enter together.
- Rotate damaged squads to safe buildings for recovery or conscription.
- Retake lost connectors quickly rather than allowing the enemy to establish a route.
- Begin the Temple reset before minute 40.
Phase 4: Temple Onslaught, Minutes 40–60
The Temple of Tides opens at minute 40. The legion should arrive healed, grouped, and with enough Energy to attack, reinforce, retreat, or attempt a retake. Sending squads one at a time usually allows defenders to defeat them in sequence.
After taking the Temple, protect the nearby route buildings that feed reinforcements into it. If another alliance captures first, do not assume the match is over. Regroup for a coordinated retake while maintaining as much Garrison and side-building income as possible. In the final minutes, the caller should focus the legion on the exact objective that can still change the ranking.
Energy, Healing, and Movement Management
Energy is spent on battlefield actions such as moving, advancing, retreating, reviving, and conscripting. It recovers over time, while Captain assignments can improve recovery. A powerful squad without enough Energy cannot answer an urgent Garrison or Temple call.
- Save actions for phase changes. Enter minutes 20 and 40 with enough Energy for more than one move.
- Recover behind the frontline. Move weakened squads into controlled buildings instead of fighting until they are forced back to Headquarters.
- Conscript safely. Replenish troops while garrisoned in a building that is not currently in combat.
- Use Advance and Retreat deliberately. Queue-based movement can help groups bypass congestion or reposition to adjacent buildings; follow the current in-game squad threshold.
- Avoid fixed Energy percentages. Check whether each squad can still reach, attack, reinforce, and recover during the next objective window.
Best Squad and Formation Approach
There is no single troop ratio that is optimal for every account, opponent, and building. Use three functional presets instead of spreading your best heroes evenly just to make all displayed squad powers look similar.
- Objective squad: your strongest combat formation for contested Garrisons and the Temple.
- Holding squad: a stable formation for lane anchors, reinforcement, and building defense.
- Flexible squad: a mobile formation for open captures, route recovery, support, and low-pressure duties.
Choose heroes with useful expedition combat skills and make each squad strong enough to complete its assigned job. Formation choices should reflect whether the squad is attacking, defending, or moving between lightly contested objectives.
Preparing a Stronger Kingshot Account
Organization can overcome many power differences, but stronger hero depth, gear, research, and troop progression make anchor, Garrison, and Temple duties easier to perform. Players who prefer to begin from a more developed profile can review available Kingshot accounts. Compare the account’s march depth and progression with the role you intend to play rather than judging it only by headline power.
Officer Checklist Before Battle
- Confirm the final battle slot and actual attendance.
- Build each legion separately instead of copying one roster into both.
- Select substitutes who can enter quickly and understand a defined role.
- Name one lead caller and one backup caller.
- Assign every lane anchor, supporter group, strike player, and reaction player.
- Publish the opening route and mark Transit Centers before battle day.
- Set a clear minute-20 Garrison call and minute-40 Temple regroup call.
- Ensure enough officers or commanders are present to manage marks and Captains.
- Ask every combatant to prepare three squad presets.
- Use voice chat or very short text commands during the match.
Simple Command Templates
- Opening: “Lane groups take assigned anchors. Supporters hold behind. Reaction waits at the marked center.”
- Garrison: “Defend our Garrison. Strike team moves to the marked target. Reaction covers the pressured lane.”
- Reset: “Stop chasing. Recover, conscript, and regroup at the marked connector before the next phase.”
- Temple: “Main group enters on countdown. Support protects the feeder route. Backup moves only on call.”
Common Tri-Alliance Clash Mistakes
| Mistake | Why It Loses Matches | Better Approach |
|---|---|---|
| Creating the plan during Preparation | Three minutes is too short for roster and route decisions | Publish roles and opening targets before Saturday |
| Registering unreliable players | No-shows leave lanes and reaction roles uncovered | Prioritize confirmed attendance and useful substitutes |
| Chasing kills | It consumes Energy while scoring buildings are lost | Fight only for a structure, route, or planned rotation |
| Overextending a lane | The anchor becomes isolated and the connector behind it falls | Advance only as fast as support can secure the route |
| Attacking Garrisons one squad at a time | Defenders defeat arrivals in sequence | Land a coordinated wave on the caller’s countdown |
| Spending all Energy early | Squads cannot respond at minutes 20 and 40 | Preserve enough actions for both major transitions |
| Splitting the strike team | It loses the numbers needed for a breakthrough | Move the unit as one group toward a clear target |
| Arriving late to the Temple | The enemy establishes control before your legion is grouped | Start healing and regrouping before minute 40 |
| Using multiple competing callers | Players split between objectives and timings | Use one lead voice and one backup only |
FAQs
How often does Tri-Alliance Clash take place?
It normally opens once per month, with voting on Monday and Tuesday, sign-up on Wednesday and Thursday, matchmaking on Friday, and battle on Saturday. Check the kingdom calendar because availability can depend on progression and the current event cycle.
How many players can join each legion?
Officers can select up to 30 combatants and 10 substitutes for a legion. A legion needs at least 15 total registrants to qualify for matchmaking, and every participant can deploy up to three squads.
What is the main way to score points?
Control point-producing buildings for as long as possible. Kills help only when they support a capture, defense, or route recovery.
When do Garrisons and the Temple open?
Garrisons open at minute 20, and the Temple of Tides opens at minute 40. These are the two most important transition timings for roster movement and Energy planning.
Should lower-power players participate?
Yes, when they can follow assignments. Support, reaction, captain, reserve, and communication roles reward reliability and timing, not only raw squad strength.
Is the first Temple capture always enough to win?
No. The Temple continues producing points, routes can be cut, and a coordinated retake remains possible. Officers should also confirm the current extra-bonus condition in the live rule panel.
Should all three squads have equal power?
No. It is usually more practical to build one strong objective squad, one dependable holding squad, and one flexible squad for captures and support.
Why might a player be unable to participate?
Common reasons include an alliance outside the required power ranking, a legion with too few registrants, or not being selected within the roster limit. The live deployment page shows the applicable restriction.
Conclusion
The central lesson of this Kingshot Tri-Alliance Clash guide is that structure beats improvisation. Assign every route, keep supporters behind the frontline, preserve Energy for the minute-20 and minute-40 transitions, and move as a coordinated legion instead of chasing isolated battles. A disciplined roster that protects scoring buildings and arrives together at the Temple gives itself the best chance to finish first.
For more event strategies, hero planning, and progression advice, explore more Kingshot guides on Heaven Guardian.