
Swordland Showdown in Kingshot is a one-hour alliance PvP battlefield where two matched Legions compete for Relic Points. Winning requires more than defeating enemy troops: alliances must capture and hold structures, protect accumulated points, collect dropped supplies, use battlefield mobility effectively, and coordinate attackers, defenders, and support players.
The most important strategy is to avoid treating Swordland like a normal city-burning event. Buildings create the points that determine victory, while PvP combat primarily helps by removing enemy troops, disrupting garrisons, and contributing to personal performance. A coordinated alliance that controls several valuable structures can defeat a stronger opponent that focuses too heavily on fighting individual cities.
Prioritize early first-control bonuses, secure Sanctums and useful bonus buildings, protect structures that have accumulated Relic Points, and only commit heavily to the Swordshrine when your alliance can realistically hold it. Personal scoring still matters even when the overall battle is going badly.
What Is Swordland Showdown?
Swordland Showdown is a recurring alliance battlefield that runs through voting, registration, matchmaking, and battle phases. The battle itself lasts one hour. Alliances must be among the top 20 on the Alliance Power leaderboard before the voting phase begins to qualify.
The event uses Legions containing combatants and substitutes. Leadership handles the final battle time and roster, so members should only register for a time they can reliably attend.
| Feature | Swordland Showdown |
|---|---|
| Event Type | Alliance PvP battlefield |
| Battle Duration | 1 hour |
| Main Objective | Finish with more Alliance Relic Points |
| Combatants | Up to 30 per Legion |
| Substitutes | Up to 10 per Legion |
| Major Point Sources | Building control, point packages and Undercellars |
| Battlefield Troops | No permanent battlefield troop loss |
Swordland Registration and Matchmaking
Preparation begins before anyone enters the battlefield. The event includes a two-day voting phase, two-day registration phase, and two-day matchmaking phase before the one-hour battle. R4 and R5 officers select the final battle time during registration.
Only Register Players Who Can Attend
Attendance matters because an empty battlefield slot is one less active player capturing buildings, reinforcing garrisons, joining rallies, or gathering Relic Points. Confirm availability before leadership finalizes the Legions.
How Matchmaking Power Works
Current matchmaking rules use the total Squad Power of the top 20 Governors among registered combatants and substitutes. Simply registering fewer combatants does not reduce matchmaking strength through headcount alone. Substitute Power is also included when a substitute is among those top 20 Governors.
Squad Power primarily reflects systems such as Governor Gear, Hero Gear, and Battle Tech rather than raw city Power alone.
Do not assume that deliberately registering fewer players automatically creates an easier matchup. Current matchmaking looks at the top 20 Squad Power values among combatants and substitutes, so roster quality matters more than simply reducing headcount.
Prepare Before Entering the Battlefield
Players can be prevented from entering if soldiers are unavailable. Before battle time, recall gathering marches, finish or cancel attacks, remove unnecessary garrisons, deal with a burning Guard Station, and heal troops already sitting in your normal Infirmary.
Also prepare your combat setup before the fighting starts:
- Equip your strongest appropriate Governor Gear and Hero Gear.
- Prepare offensive and defensive march presets.
- Activate applicable combat bonuses and Pet Skills when valuable.
- Know whether your role is rally leader, garrison leader, rally joiner, or support.
- Agree on initial building assignments with alliance leadership.
- Use battlefield chat and alliance communication for real-time target calls.
Hero generations vary greatly between kingdoms. Instead of copying one fixed hero lineup, use your best developed current-generation PvP heroes for rally leadership and your strongest suitable defensive combination when leading important garrisons.
How Relic Points Work
Alliance victory is determined by Alliance Relic Points, while your own activity also produces Personal Relic Points.
Major point sources include:
- First control of battlefield structures
- Continuing to hold point-producing buildings
- Collecting point packages dropped after structures change hands
- Gathering Undercellars when they become available
- Defeating enemy soldiers for personal combat points
This distinction is important. Burning enemies can improve your personal score and weaken their ability to fight, but combat by itself does not replace map control. Your alliance still needs buildings and other alliance-scoring objectives to win.
First Control Matters
Capturing several buildings early provides first-control opportunities. Do not send the entire Legion to one structure while the enemy freely occupies everything else.
A normal structure requires an occupation period before full control is established. The Bell Tower reduces that control time, making it especially useful during the opening and when structures repeatedly change hands.
Protect Accumulated Building Points
A particularly important Swordland mechanic is the points stored on controlled buildings. Part of the Relic Points generated by a structure remains exposed there. If the enemy captures that structure, those accumulated points are removed and scattered as collectible packages.
This creates two strategic priorities: protect your own high-value buildings when they have accumulated a large reserve, and look for enemy structures carrying a large reserve before launching a coordinated capture attempt.
A heavily banked enemy structure can be more valuable than a random city attack. Coordinate the capture, then immediately assign marches to collect the dropped point packages before the opposing Legion takes them back.
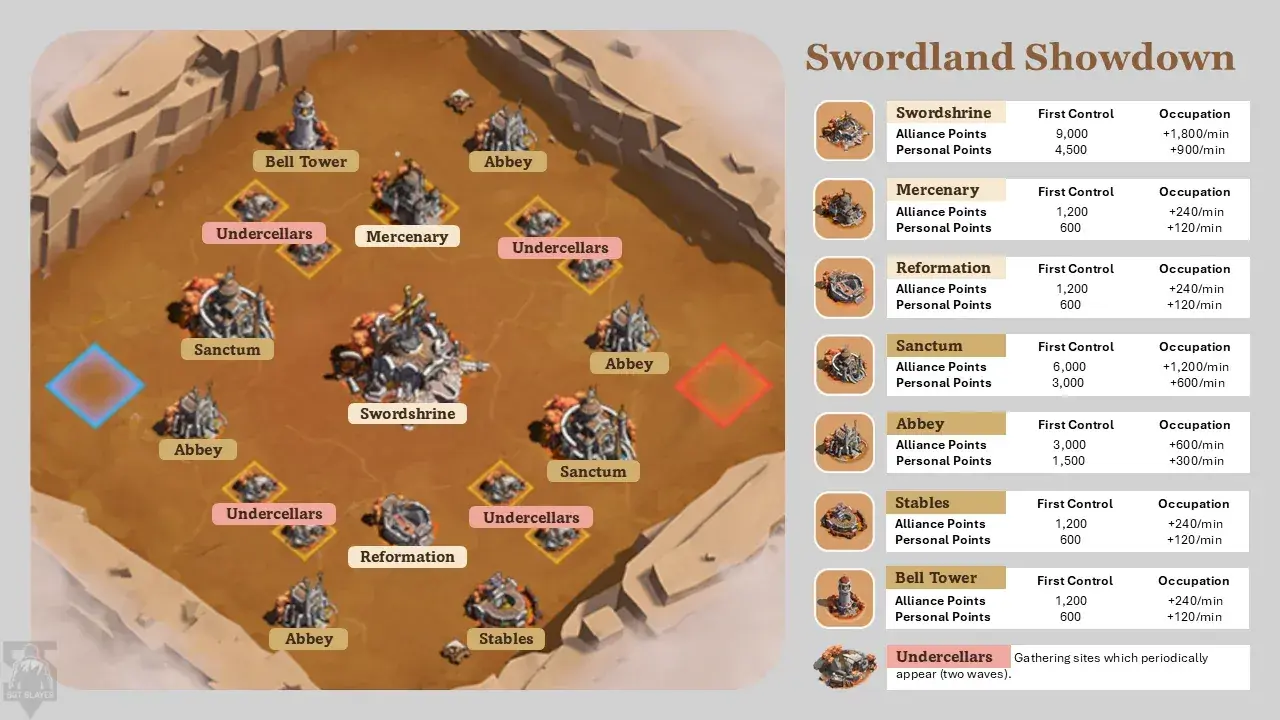
Swordland Showdown Buildings Explained
| Structure | Main Value | Recommended Use |
|---|---|---|
| Swordshrine | Highest point-producing central structure | Contest when your alliance can support and reinforce it |
| Sanctum | High sustained Relic Point income | Major priority throughout the battle |
| Abbey | Steady Relic Point income | Useful for spreading map control |
| Bell Tower | Reduces building occupation time | Strong early and recapture objective |
| Royal Stables | Reduces free teleport cooldown | Excellent for mobility and late-game rotations |
| Hall of Reformation | Provides a combat benefit | Useful when battles are closely matched |
| Mercenary Camp | Enables mercenary attacks against structures | Coordinate with a real attack or rally |
| Undercellars | Gatherable Relic Points | Send support or spare marches when available |
Best Swordland Showdown Strategy by Phase
Opening Phase: Spread Out and Secure First Controls
The Swordshrine begins locked, so the opening should focus on available point and utility buildings. A practical priority is to secure valuable Sanctums while also taking structures such as the Bell Tower or Royal Stables.
Strong players should not all stack into the same garrison. Spread enough power across the battlefield to contest multiple objectives while preserving rally leaders for difficult enemy positions.
Midgame: Reassess When the Swordshrine Opens
The central Swordshrine becomes available after the opening portion of the battle. It generates the most points, but that does not mean every Legion should immediately abandon the rest of the map for it.
If the enemy can easily hold the Swordshrine against you, maintaining two Sanctums, several secondary structures, and useful buff buildings can produce more value than repeatedly sending failed rallies into the center.
If your alliance can realistically take it, coordinate multiple strong rallies, reinforce quickly, and prepare for repeated attacks. The Swordshrine attracts constant pressure.
Late Game: Attack Banked Points
Late Swordland battles can swing quickly because controlled buildings may have accumulated large point reserves. If you are behind, identify enemy structures carrying significant stored points and coordinate a concentrated capture.
As structures flip, send spare marches immediately for the dropped packages. Undercellars are also worth gathering, particularly for support players who are not needed in an urgent rally or garrison.
Assign Three Basic Battlefield Roles
Attackers and Rally Leaders
Use your strongest offensive accounts to pressure major buildings and vulnerable enemy cities. Their job is to remove enemy troops, force healing, open structures for capture, and lead rallies that weaker players cannot win themselves.
Do not waste strong marches repeatedly attacking targets that can simply absorb them. Watch where enemy top heroes and troops are deployed. A Governor with several important marches outside the city may temporarily be easier to pressure.
Defenders and Garrison Leaders
Defenders should hold Sanctums, the Swordshrine, and other important structures with your strongest suitable garrison setup. Reinforcement coordination matters as much as the initial capture.
Do not leave a valuable structure overloaded with weak or poorly coordinated troops while your best defender is somewhere unimportant.
Support Players
Lower-Power players remain extremely useful. They can reinforce strong garrisons, join rallies, collect dropped Relic Points, gather Undercellars, take lightly defended Abbeys, and use spare marches to help maintain map control.
If your city cannot survive direct attacks, the battlefield safe zone provides an alternative position. Cities inside the safe zone cannot be attacked by opponents, allowing vulnerable players to continue contributing through marches and rallies.
Healing and the 12-Minute Exit Strategy
Swordland has its own battlefield troop handling. You can fight aggressively without permanent battlefield casualties, and leaving the battlefield heals your injured troops. The tradeoff is a 12-minute cooldown before you can return, which is significant in a battle lasting only one hour.
Use the exit-to-heal option when your army has become so depleted that staying provides little value. Leaving with only a few minutes remaining is usually a poor trade because you may not return before the battle is decided.
The event also provides battlefield healing and march-speed resources. Use them when they help maintain pressure rather than saving event-specific resources while your marches remain inactive.
When Should You Leave to Heal?
- Your available troop count has become too low to contribute effectively.
- A large portion of your army is injured and the battle has enough time remaining.
- Your team can temporarily cover your assigned building or role.
- You expect to return with enough time to make the 12-minute absence worthwhile.
Batch-healing methods used with normal alliance assistance are not the primary solution inside this battlefield. Plan around Swordland’s own healing system instead.
Use Teleports and March Speedups Aggressively
Mobility is one of Swordland’s most important resources. The battlefield provides free movement tools, while the Royal Stables improves teleport availability.
Use teleports to:
- Move rally leaders near an important target.
- Respond quickly when a high-value building is threatened.
- Collect point packages after a structure flips.
- Escape a stronger city attacker.
- Rotate from an uncontested part of the map to an active objective.
Avoid teleporting beside every building automatically. A weaker player positioned directly beside an objective becomes an easy city target. You can often operate from a safer location and use the battlefield’s free march-speed tools instead.
How to Score When Your Alliance Is Losing
A difficult matchup does not make the entire event worthless. Personal performance still matters, so continue earning Personal Relic Points even when winning becomes unrealistic.
Focus on activities you can still complete:
- Join strong rallies.
- Attack realistic enemy targets.
- Capture neglected buildings.
- Gather Undercellars.
- Collect dropped Relic Point packages.
- Use the exit-to-heal mechanic and return with a usable army.
Do not feed troops into an impossible garrison simply because your Legion is behind. Look for objectives that improve your own contribution while forcing the enemy to spread across the battlefield.
Legion 1 and Swordland Rewards
Reward handling has an important Legion rule: battle-outcome rewards are tied to your alliance’s Legion 1 result rather than simply whichever Legion a combatant personally fought with. This makes the composition and activity of Legion 1 particularly important to the alliance.
Swordland also provides access to progression materials and Swordland Shop purchases. Available items can include valuable Governor Gear and Governor Charm materials such as Artisan’s Vision and Charm-related resources. Shop availability and purchase limits can change with kingdom progression and game updates.
What Should You Buy From the Swordland Shop?
Artisan’s Vision is a strong long-term purchase once Governor Gear progression makes it a bottleneck. Charm Guides and Charm Designs can also be valuable when Governor Charms are an active progression priority.
Do not follow one shop order blindly. Check which material is actually blocking your next meaningful upgrade, especially as new systems and higher kingdom progression expand the shop.
Common Swordland Showdown Mistakes
- Registering players who will not attend. Activity is critical on a limited battlefield roster.
- Believing fewer combatants automatically means easier matchmaking. Current matchmaking uses the top 20 Squad Power values among combatants and substitutes.
- Entering with unavailable troops. Recall gathering, garrison, and attack marches before battle.
- Ignoring first-control opportunities. Spreading across early buildings creates immediate scoring value.
- Fighting only for the Swordshrine. Sanctums and multiple secondary structures can outweigh endless failed center rallies.
- Ignoring stored building points. A late structure flip can create a major swing.
- Forgetting to collect dropped packages. Capturing the building is only part of the opportunity.
- Wasting support players. Gathering, reinforcing, rally joining, and point collection all matter.
- Leaving the battlefield too late. The 12-minute return cooldown can remove you from the rest of the match.
- Saving battlefield movement tools unnecessarily. Mobility has value only when you use it to improve positioning and activity.
Optional Progression Shortcut
Players who want to compete from a more developed starting point can also review available Kingshot accounts for sale. For Swordland performance, compare Hero Gear, Governor Gear, Battle Tech, current hero generation, troop development, and overall PvP depth rather than judging an account by total Power alone.
FAQs
How long is Swordland Showdown?
The battle phase lasts one hour.
How many players can participate?
A Legion can register up to 30 combatants and 10 substitutes. Leadership should prioritize players who can reliably attend the selected time.
How does Swordland matchmaking work?
Matchmaking uses the total Squad Power of the top 20 Governors among registered combatants and substitutes. The number of registered combatants by itself does not determine the matchup.
What is the most important building in Swordland Showdown?
The Swordshrine provides the highest sustained point value, but Sanctums and multiple secondary buildings can collectively be more important if your alliance cannot hold the center.
What does the Bell Tower do?
The Bell Tower reduces the time required to establish control over buildings, making it useful for early captures and repeated recaptures.
What happens to troops injured in Swordland?
Battlefield injuries are not permanent troop losses. You can also leave the battlefield to recover your injured army, but you must wait 12 minutes before returning.
Can I enter Swordland with troops gathering?
No. Soldiers that are gathering, attacking, garrisoned, or otherwise unavailable can prevent battlefield entry. Existing injured troops and a burning Guard Station can also cause problems, so prepare your city before the start.
Can weaker players contribute in Swordland Showdown?
Yes. Support players can reinforce strong garrisons, join rallies, gather Undercellars, collect dropped point packages, occupy neglected structures, and operate from safer positions.
Do I need to win to get useful rewards?
No. The alliance result matters, but personal participation and scoring remain important. Continue earning Personal Relic Points even during an unfavorable matchup.
What should I buy in the Swordland Shop?
Artisan’s Vision is a strong long-term option for Governor Gear progression. Charm materials and other available progression resources can be better when they are the immediate bottleneck on your account.
Conclusion
The best Kingshot Swordland Showdown strategy is built around map control rather than random fighting. Secure first controls, prioritize Sanctums and useful bonus structures, contest the Swordshrine only when your alliance can support it, and watch the Relic Points accumulating on both friendly and enemy buildings.
Good alliances also manage the battlefield as a team. Strong players lead important rallies and garrisons, support players reinforce and gather, everyone uses mobility intelligently, and depleted fighters use the 12-minute exit-to-heal mechanic only when enough battle time remains.
For more alliance event strategies, hero advice, building guides, and progression help, explore our additional Kingshot guides on Heaven Guardian.