

This Albion Online gathering guide 2026 explains how to choose a resource, develop your gathering profession, select suitable equipment, find productive routes, and bring your materials home safely.
Gathering is one of the most accessible ways to earn silver in Albion Online. You can begin with inexpensive tools, gather resources directly from the open world, and sell the materials without investing in an advanced crafting setup.
However, successful gathering involves more than clicking every resource node you find. Profit depends on your specialization, gathering speed, route competition, market prices, equipment cost, and how often you survive the return journey.
There is no permanent best gathering resource or single best gathering zone. Prices and player activity change constantly. A quieter Tier 6 route can outperform a crowded Tier 7 zone where most valuable nodes have already been collected.
New players should choose one primary resource, use the highest tool they can replace, wear the matching gathering set from Tier 4 onward, eat a gathering pie, and gather in the resource’s primary biome. Move into lethal zones only after learning your equipment abilities, mount behavior, banking route, and escape combination.
Gathering in Albion Online

Gathering is the process of collecting raw materials from resource nodes and resource mobs found throughout Albion’s open world.
Gathered resources can be:
- Sold directly on the marketplace
- Refined into processed materials
- Used to craft equipment and consumables
- Transported to another city for a better selling price
- Recorded in gathering journals for laborers
There are five main open-world gathering professions.
Scroll sideways to view the full table.
| Resource | Profession | Required Tool | Refined Material |
|---|---|---|---|
| Wood | Lumberjacking | Axe | Planks |
| Ore | Mining | Pickaxe | Metal Bars |
| Fiber | Harvesting | Sickle | Cloth |
| Hide | Skinning | Skinning Knife | Leather |
| Stone | Quarrying | Stone Hammer | Stone Blocks |
Fishing is also a gathering profession, but it has separate equipment, locations, progression, bait, and food mechanics. This guide focuses on wood, ore, fiber, hide, and stone.
How Gathering Works in Albion Online
To gather a resource, place the correct gathering tool in your inventory. The tool does not need to be equipped as your combat weapon.
For example:
- Axes collect wood.
- Pickaxes collect ore.
- Sickles collect fiber.
- Skinning Knives collect hide.
- Stone Hammers collect stone.
Gathering provides resources and gathering fame. The fame improves your profession on the Destiny Board, unlocks better tools, and develops specialization for specific resource tiers.
Gathering One Tier Above Your Tool
A gathering tool can normally collect flat resources one tier above the tool, but the process is much slower.
For example, a Tier 5 tool can gather:
- Tier 5 flat and enchanted resources
- Tier 6 flat resources at reduced speed
- Tier 4 and lower resources
Enchanted resources generally require a tool that matches the resource tier. For efficient progression, gather resources at your current tool tier or below rather than building an entire route around slow, one-tier-higher nodes.
Resource Charges
Each resource node contains a limited number of charges. A full node provides more materials than a nearly empty node.
When competition is high, stopping for every one-charge flat node can reduce your overall efficiency. Prioritize:
- Full nodes
- Enchanted resources
- Resource mobs
- Nodes that fit naturally into your route
- Nodes that can be gathered while remaining close to your mount
Albion Online Resource Tiers and Enchantments
Resources are divided into tiers. Higher-tier resources require better tools and more gathering progression.
Resources from Tier 4 onward may also appear with enchantments.
Scroll sideways to view the full table.
| Resource Type | Common Name | Example |
|---|---|---|
| Normal | Flat or .0 | T6.0 |
| Uncommon | .1 | T6.1 |
| Rare | .2 | T6.2 |
| Exceptional | .3 | T6.3 |
| Pristine | .4 | T6.4 |
Higher enchantments generally provide more valuable materials and stronger gathering fame. They are also more contested.
Before stopping for a valuable node, check:
- Nearby player nameplates
- Your distance from the mount
- Roads and entrances near the node
- The number of remaining charges
- The value already carried in your inventory
- Whether the node could be used as bait
Albion Online Biomes and Resources
Albion has five main biomes. Each biome contains a primary, secondary, and tertiary resource.
The primary resource appears most frequently, making the biome more efficient for players specializing in that material.
Scroll sideways to view the full table.
| Biome | Royal City | Primary Resource | Secondary Resource | Tertiary Resource |
|---|---|---|---|---|
| Forest | Lymhurst | Wood | Hide | Stone |
| Highland | Martlock | Stone | Ore | Wood |
| Mountain | Fort Sterling | Ore | Stone | Fiber |
| Steppe | Bridgewatch | Hide | Fiber | Ore |
| Swamp | Thetford | Fiber | Wood | Hide |
Best Biome for Each Gathering Profession
- Wood: Forest around Lymhurst
- Stone: Highland around Martlock
- Ore: Mountain around Fort Sterling
- Hide: Steppe around Bridgewatch
- Fiber: Swamp around Thetford
You do not have to live in the matching city. However, beginning near your primary resource shortens travel and makes banking easier while leveling.
What Is the Best Gathering Profession in Albion Online?
There is no gathering profession that is permanently best. The right choice depends on market demand, competition, specialization, nearby biomes, and how you prefer to play.
Scroll sideways to view the full table.
| Resource | Main Advantage | Main Disadvantage | Recommended For |
|---|---|---|---|
| Wood | Easy to gather while moving through a route | Popular Forest routes can be crowded | Beginners and route gathering |
| Ore | Broad demand from weapons, armor, and tools | Mountain terrain can create chokepoints | Players near Fort Sterling |
| Fiber | Visible nodes and consistent cloth demand | Popular Swamp routes can be heavily gathered | Fast gathering loops |
| Hide | Often has strong market demand | Animals must be killed before skinning | Players with a suitable PvE weapon |
| Stone | Can be less contested than fashionable resources | Heavy weight and changing construction demand | Safe-zone volume gathering |
Best Gathering Profession for Beginners
Wood and fiber are generally the easiest resources for beginners because their nodes can be gathered immediately without fighting an animal first.
Hide can be profitable, but skinning requires a combat-capable weapon and keeps you exposed while killing resource mobs.
The simplest starting choice is the primary resource near your current Royal City:
- Lymhurst for wood
- Martlock for stone
- Fort Sterling for ore
- Bridgewatch for hide
- Thetford for fiber
Should Beginners Level Every Gathering Profession?
Beginners should not level all five professions equally.
Choose one primary gathering line and develop it toward Tier 6 before spreading Learning Points across several professions. Higher-tier tools and specialization usually provide more value than carrying five low-level tools.
You may carry one secondary tool when its resource appears frequently in the same biome, but your primary profession should receive most of your attention.
What Is the Most Profitable Resource to Gather in 2026?
The most profitable resource changes with:
- Current market prices
- Resource tier and enchantment
- Your gathering specialization
- Competition in the zone
- Server population and time of day
- Crafting and refining demand
- Transport distance
- Your survival rate
Hide and ore often receive attention because leather and metal are used by many combat and crafting lines. This does not make them automatically more profitable.
A specialized stone gatherer collecting uncontested enchanted nodes can earn more than a low-specialization skinner competing with several players and losing expensive sets.
Measure Profit per Successful Trip
Do not judge gathering profitability only by the estimated silver value shown while you are still in the zone.
Gathering profit formula: Value of resources successfully banked minus food, repairs, equipment losses, tools, marketplace fees, and transport costs.
A slightly lower-value resource that lets you survive consistently may produce better long-term profit than a dangerous high-value route.
Check Prices Before a Major Session
Compare:
- Flat resource prices
- .1, .2, .3, and .4 prices
- Raw resource prices
- Refined material prices
- Prices in multiple Royal Cities
- Recent sales volume
Do not continue gathering one resource only because it was profitable during a previous update.
Where to Gather in Albion Online
Gathering by Zone Type
Scroll sideways to view the full table.
| Zone | PvP Risk | General Gathering Value | Best Use |
|---|---|---|---|
| Blue Zone | No lethal PvP | Low-tier resources and high competition | Learning tools and routes |
| Yellow Zone | Non-lethal knockdowns | Low and middle-tier resources | Safe profession progression |
| Red Zone | Full-loot PvP | Better resources with visible hostile count | Learning lethal gathering |
| Black Zone | Unrestricted full-loot PvP | Higher tiers and enchantment potential | Experienced gatherers |
| Non-Lethal Mists | Non-lethal | Mixed resources in a solo environment | Safe solo gathering practice |
| Lethal Mists | Full-loot PvP | Mixed resources and potential higher tiers | Mobile solo gatherers |
| Roads of Avalon | Full-loot PvP | Variable resources and resource mobs | Explorers and small groups |
The Roads of Avalon can contain different resource types and tiers. They are useful for flexible gatherers, but their routes and exits change and may be difficult to predict.
Mists provide mixed resources in a solo environment. Non-lethal Mists are useful for practice, while lethal Mists offer greater potential with full-loot risk.
Best Gathering Spots in Albion Online
There is no permanent list of the best gathering zones. Publishing a specific zone often attracts more gatherers and gankers, reducing its value.
A productive gathering zone usually has:
- The correct primary biome
- Resources matching your tool tier
- Several possible exits
- Low player traffic
- Limited portal or hideout activity
- Few narrow chokepoints
- A practical banking route
- Enough distance from major entrances
How to Find a Better Gathering Zone
- Select the biome where your target material is the primary resource.
- Check the zone tier and available resources on the world map.
- Avoid relying on the first zone outside a city or portal.
- Move farther from predictable transport and travel routes.
- Check whether nodes are full or repeatedly depleted.
- Leave when several gatherers begin following the same loop.
- Record which routes perform well at different times of day.
An uncontested lower-tier route can outperform a famous higher-tier zone where most nodes are empty.
Check the Map Before Gathering
Before travelling, inspect:
- Zone tier
- Biome
- Available resources
- Enchantment rate
- Resource hotspot icons
- Number and position of exits
- Distance from your bank, city, rest, or hideout
Dynamic Resource Hotspots
Dynamic resource hotspots can provide concentrated gathering opportunities for a specific resource and tier.
Before travelling toward a hotspot, check:
- The resource type
- The hotspot tier
- The zone’s PvP rules
- The nearest exits
- Roads and chokepoints around the location
- The value already carried in your inventory
Hotspots attract other gatherers and can also attract players searching for valuable targets. Avoid approaching one with an expensive inventory and no escape route.
Learn how the icons and locations work in our detailed guide to dynamic resource hotspots in Albion Online.
Best Black Zone for Hide Farming in 2026
There is no permanent best Black Zone for hide farming. A named zone can become unprofitable as soon as skinners and gankers begin visiting it regularly.
A strong hide-farming zone usually has:
- A Steppe biome
- Animals matching your Skinning Knife tier
- Higher-tier or enchanted hide mobs
- Open terrain with several escape directions
- Multiple exits
- Low portal and hideout traffic
- Enough distance from common transport roads
Black Zone Hide Farming Route
- Enter with a replaceable Skinner set and mobility weapon.
- Move away from the portal and obvious roads.
- Follow the outside of the map rather than repeatedly crossing the center.
- Kill and skin animals while remaining close to your mount.
- Skip low-charge mobs when suspicious players are nearby.
- Change direction when another player repeatedly follows your route.
- Bank after a profitable haul rather than waiting for a full inventory.
Hide gathering creates additional risk because fighting animals produces sound and keeps you dismounted. Scan the edge of the screen between attacks and skinning actions.
Albion Online Gathering Equipment
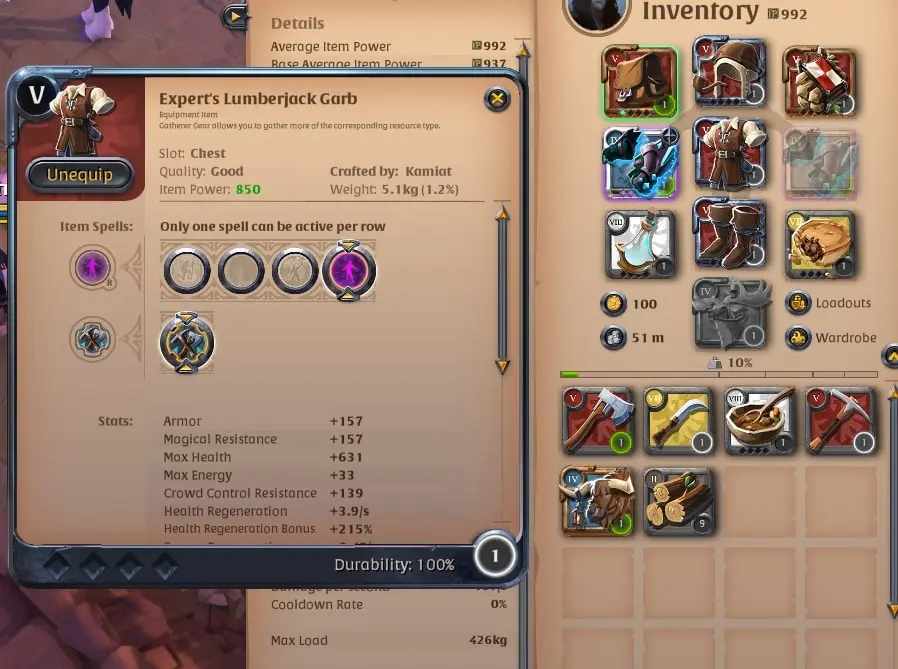
Dedicated gathering equipment becomes available from Tier 4. Each profession has a matching equipment set.
Scroll sideways to view the full table.
| Resource | Gathering Set | Matching Backpack |
|---|---|---|
| Wood | Lumberjack Set | Lumberjack Backpack |
| Ore | Miner Set | Miner Backpack |
| Fiber | Harvester Set | Harvester Backpack |
| Hide | Skinner Set | Skinner Backpack |
| Stone | Quarrier Set | Quarrier Backpack |
A complete gathering set includes:
- Gathering Cap
- Gathering Garb
- Gathering Workboots
- Matching Backpack
Gathering Tools
Use the highest gathering tool you can afford to replace safely.
Higher-tier tools provide:
- Faster gathering
- Access to higher-tier enchanted resources
- Better route efficiency
- Less time spent exposed beside a node
Avalonian Gathering Tools
Avalonian gathering tools provide additional gathering yield. They can be valuable when collecting expensive high-tier resources with strong specialization.
A normal tool is usually safer when:
- You are learning Red or Black Zone routes
- Your specialization is still low
- You frequently lose equipment
- You are gathering inexpensive materials
- The additional yield does not cover the increased risk
Gathering Cap, Garb, and Workboots
The cap, garb, and workboots provide passive yield bonuses for their matching profession.
Their active abilities may provide:
- Movement speed
- Invisibility
- Crowd-control protection
- Knockback
- Defensive shields
- Help with killing resource mobs
Gathering equipment is primarily designed for yield and escape. It is not intended to win normal open-world fights against dedicated combat builds.
Gathering Gear Passive Preparation
Gathering gear passives need time to reach their full effect after the equipment is worn.
Avoid switching into a gathering set immediately before collecting an important node. Equip the set before beginning the route so the passive bonuses are ready.
Gathering Backpacks
A matching gathering backpack reduces the effective weight of its resource up to the backpack’s supported tier.
The backpack occupies the cape slot. In dangerous zones, you may prefer:
- Fort Sterling Cape: Automatic removal of a crowd-control effect
- Undead Cape: Emergency invisibility at low health
- Regular Cape: Low replacement cost
Choose between carrying efficiency and defensive protection based on the route’s danger.
Best Gathering Consumables
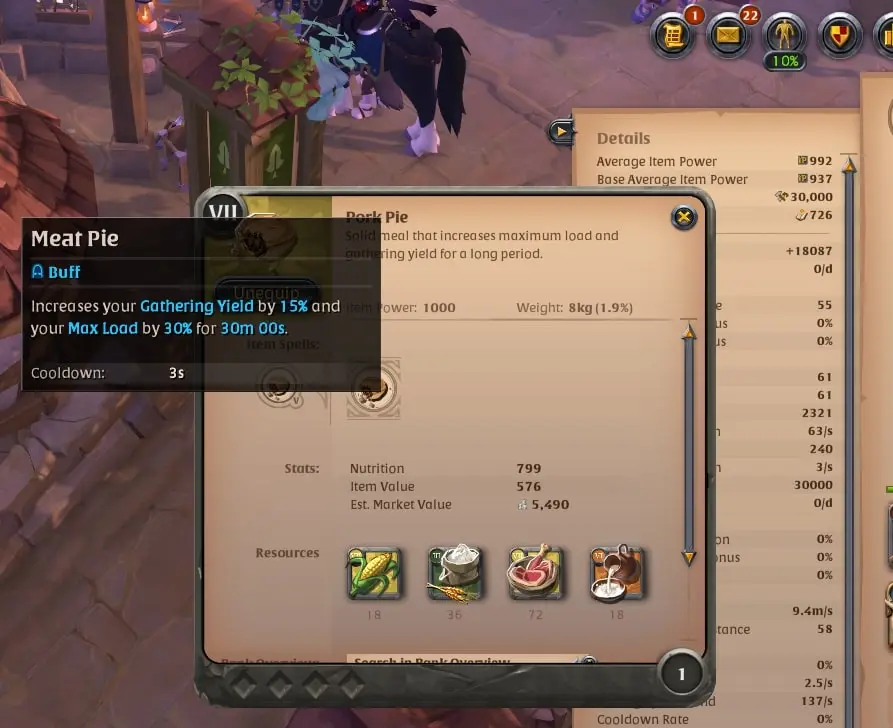
Best Food for Gathering
Pies are the main gathering food because they improve gathering yield and maximum carrying capacity.
Scroll sideways to view the full table.
| Food | General Role | Best Use |
|---|---|---|
| Chicken Pie | Entry-level gathering bonus | New players and short routes |
| Goose Pie | Budget yield and carrying support | Low- and mid-tier gathering |
| Pork Pie | Strong yield and maximum-load bonus | Standard gathering sessions |
| Frostpeak Deadeye Pie | Gathering support with additional defensive utility | Selected dangerous routes |
Pork Pie remains the standard option for most gathering sessions. Enchanted food can provide stronger bonuses, but the increased cost should be justified by the expected resource value.
Best Potions for Gathering
Scroll sideways to view the full table.
| Potion | Best Use |
|---|---|
| Invisibility Potion | Breaking vision and changing escape direction |
| Resistance Potion | Surviving burst damage and control |
| Healing Potion | Recovering after resource mobs or minor damage |
| Gigantify Potion | Temporary survivability and emergency carrying support |
An Invisibility Potion is not a guaranteed escape. Damage-over-time effects, reveals, and enemy mobility may allow players to continue following you.
Best Mounts for Gathering in Albion Online

The best gathering mount depends on the zone, resource weight, route length, and amount of silver you can afford to lose.
A mount with maximum carrying capacity is not automatically the safest choice. Speed, durability, remounting, passive effects, and replacement cost also matter.
Scroll sideways to view the full table.
| Mount | Carry Capacity | Main Advantage | Best Use |
|---|---|---|---|
| Riding Horse | Low | Cheap and replaceable | Short or budget gathering trips |
| Transport Ox | Very high | Large carrying capacity | Blue and Yellow Zones |
| Giant Stag | Moderate | Balanced price, speed, and load | Budget open-world gathering |
| Moose | Good | Useful speed and capacity balance | Longer gathering routes |
| Swiftclaw | Low | Fast movement | Lightweight Black Zone trips |
| Swamp Salamander | Good | Durability and defensive utility | Dangerous gathering routes |
| Wild Boar | Very high | Strong carrying capacity without using an Ox | Experienced high-volume gatherers |
Why Transport Oxen Are Risky in Lethal Zones
Transport Oxen carry a large amount but are slow and create dangerous dependence on their load bonus.
If you become separated from the mount, the carried resources may leave you heavily overloaded and unable to escape.
Use an Ox in safe zones or protected group routes. Solo lethal-zone gatherers should normally choose a mount that allows reasonable movement after being dismounted.
The Best Gathering Mount Is Replaceable
A premium mount is not useful if one death removes several days of profit.
Choose a mount that:
- Supports the expected resource weight
- Matches the route’s danger
- Can be replaced without damaging your silver balance
- Does not encourage you to remain outside too long
Best Weapons for Gathering
A gathering weapon has two main purposes:
- Kill resource mobs when necessary.
- Help you escape enemy players.
In safe zones, use almost any weapon you want to level. In lethal zones, mobility is generally more valuable than maximum damage.
Scroll sideways to view the full table.
| Weapon | Main Strength | Best Use |
|---|---|---|
| Double-Bladed Staff | Mobility, control, and survivability | General lethal-zone gathering |
| Bloodletter | Several movement options | Mobile gathering builds |
| Bloodletter and Mistcaller | Mobility with cooldown support | Experienced gatherers |
| Carving Sword | Mobility with reasonable combat ability | Hybrid gathering |
| Battle Bracers | Repeated movement abilities | Escaping across open terrain |
| Spear or Battleaxe | Efficient resource-mob clearing | Hide gathering in safer areas |
Weapons for Hide Gathering
Skinners must kill animals before gathering their hide.
In Blue and Yellow Zones, use a weapon that clears animals efficiently. In Red and Black Zones, mobility should usually take priority over faster kills.
Spending slightly longer on one animal is better than using a high-damage weapon that provides no escape tools.
Best Albion Online Gathering Builds
Safe-Zone Gathering Build
Scroll sideways to view the full table.
| Slot | Recommended Choice | Purpose |
|---|---|---|
| Weapon | Any weapon you want to level | Kills resource mobs and gains combat fame |
| Helmet | Matching Gathering Cap | Yield and gathering utility |
| Armor | Matching Gathering Garb | Yield and resource-mob support |
| Boots | Matching Gathering Workboots | Yield and movement |
| Cape | Matching Gathering Backpack | Reduces matching resource weight |
| Food | Pork Pie | Yield and maximum load |
| Mount | Transport Ox or Giant Stag | Carrying capacity |
Red and Black Zone Gathering Build
Scroll sideways to view the full table.
| Slot | Recommended Choice | Purpose |
|---|---|---|
| Weapon | Double-Bladed Staff or Bloodletter | Mobility and escape |
| Off-Hand | Mistcaller when using Bloodletter | Cooldown support |
| Helmet | Matching Gathering Cap | Yield and defensive utility |
| Armor | Matching Gathering Garb | Yield and escape support |
| Boots | Matching Gathering Workboots | Extended movement or escape |
| Cape | Gathering Backpack, Fort Sterling Cape, or Undead Cape | Carry efficiency or survival |
| Food | Pork Pie | Yield and maximum load |
| Potion | Invisibility or Resistance Potion | Escape or burst protection |
| Mount | Giant Stag, Moose, Salamander, or replaceable mobility mount | Balance of movement and capacity |
Treat these setups as starting points. The best equipment depends on your profession, route, budget, and current balance changes.
Optional progression consideration: Players comparing established gathering specialization, unlocked tools, available silver, and current equipment can review the included details of an Albion Online account for sale. Existing progression can reduce setup time, but route planning and survival still determine gathering profitability.
How to Level Gathering Faster
Focus on One Profession
Push one gathering profession toward Tier 6 or Tier 7 before investing heavily in other lines.
A specialized gatherer collects faster, gains more yield, and reaches valuable resources sooner than a character with several low-level professions.
Use Learning Points for Tier Progression
Gathering progression becomes slower at higher tiers. Learning Points can help advance your main gathering tool line.
Prioritize tier unlocks rather than spending large amounts across several early specialization nodes.
Gather at Your Tool Tier or Below
Although flat resources can be collected one tier above your tool, the gathering speed is poor.
For regular fame progression, quickly clearing same-tier and lower-tier nodes is usually more efficient than spending a long time on one higher-tier node.
Prioritize Resource Mobs and Enchanted Nodes
Resource mobs and enchanted nodes can provide strong fame and value.
Detour for them when the route is safe, but avoid crossing an entire dangerous zone for one node while carrying an expensive inventory.
Build a Repeatable Gathering Loop
Avoid moving randomly around the map.
Create a route that:
- Passes through high-density resource areas
- Keeps you away from busy roads
- Provides more than one exit
- Returns gradually toward your banking route
- Makes unusual player activity easy to recognize
Bank Before You Are Full
In lethal zones, consider returning when you reach roughly 60% to 80% of your comfortable carrying capacity.
Waiting until you are completely full creates a larger loss and may leave you overloaded after being separated from the mount.
Gathering Progression Priority
Scroll sideways to view the full table.
| Progress Stage | Main Goal | Recommended Area |
|---|---|---|
| Tier 2–3 | Learn tools and resource locations | Blue Zones |
| Tier 4 | Unlock the first gathering set | Blue and Yellow Zones |
| Tier 5 | Improve routes and use gathering food | Yellow Zones |
| Tier 6 | Develop specialization and risk control | Yellow and cautious Red Zones |
| Tier 7 | Search for higher-tier and enchanted resources | Red Zones, Black Zones, and Mists |
| Tier 8 | Maximize yield and target valuable nodes | Outlands, Roads, and lethal Mists |
Do not enter the Black Zone immediately after unlocking a higher-tier tool. First learn your gathering gear abilities, weapon mobility, mount behavior, and escape routes.
Albion Online Stone Gathering Guide
Stone is primarily found in Highland biomes around Martlock and corresponding Outlands regions.
Stone is used for buildings, islands, guild infrastructure, and other construction-related systems. Its demand can change more sharply than resources used in frequently replaced combat equipment.
How to Make Stone Gathering Profitable
- Prioritize enchanted stone.
- Compare raw stone and refined block prices.
- Gather in quieter Highland routes.
- Monitor construction demand after major updates.
- Use the Quarrier set and matching backpack.
- Avoid carrying excessive low-value flat stone in lethal zones.
Stone can be a good beginner profession when local Highland zones have limited competition. It becomes less attractive when low-tier prices are weak and nodes require long travel between stops.
Should You Sell Raw Resources or Refine Them?
Selling raw resources provides immediate silver and avoids refining fees, extra transport, and another market decision.
Refining may produce more profit when:
- You have useful refining specialization
- You have Premium and available focus
- You refine in the correct bonus city
- The refined material has strong demand
- Returned resources create a clear margin
- Transport costs do not remove the profit
Sell Raw Resources When
- You need silver immediately.
- Your refining specialization is low.
- You do not have focus.
- The raw resource price is unusually strong.
- The refined market has low volume.
- You want to avoid additional transport risk.
Refine Resources When
- The refining spread remains profitable after fees.
- You have relevant specialization.
- You can use focus efficiently.
- You can reach the correct refining city safely.
- The refined material sells consistently.
Refining does not automatically improve profit. Calculate both options before moving a large resource batch.
Gathering Journals
Gathering journals record eligible gathering fame and can add value to a resource run.
Filled journals can be:
- Sold on the marketplace
- Given to matching laborers
- Included in the total profit from the gathering session
Journals also have weight and an initial market cost. Bring only the number you reasonably expect to fill.
Compare the empty-journal price, filled-journal price, and expected laborer return before deciding how to use them.
How to Avoid Gankers While Gathering
Keep Your Mount Close
Dismount beside the resource node and keep the mount circle positioned toward your planned escape route.
Do not move so far from the mount that it disappears. Fast remounting is one of the most important survival tools available to a gatherer.
React to Nameplates Immediately
Create distance as soon as an unknown player appears. Do not remain dismounted while attempting to decide whether the player is friendly.
A harmless-looking player may be scouting for a larger group.
Avoid Entrances and Chokepoints
Zone exits, bridges, roads, tunnels, and portal approaches are common places for gankers to search.
Move away from major entrances before beginning your route. Gather in open areas that provide several possible escape directions.
Use Mobility in Stages
Activating every movement ability at once makes your escape easier to purge or interrupt.
A safer sequence may be:
- Create initial distance with a weapon movement ability.
- Force the attacker to use a purge or control effect.
- Use gathering gear or boots afterward.
- Move toward terrain, a zone exit, or an unpredictable path.
The correct order depends on the enemy build, but preserving separate escape stages is generally safer than using everything immediately.
Change Direction After Invisibility
After using an Invisibility Potion or another concealment ability, do not continue running in the same obvious direction.
Turn, use terrain, and move away from the path the attackers expect.
Do Not Fight for a Resource Node
Gathering equipment is designed for collection and survival. Leaving one enchanted node is cheaper than losing your tools, mount, equipment, and complete inventory.
Bank Resources Regularly
A successful gathering trip ends when the resources reach storage or the marketplace.
Several successful medium trips are usually better than one long trip that ends in a death.
Warning Signs of a Gank
- A player repeatedly follows your route.
- Dismounted players wait near a road or exit.
- Combat-equipped players appear in a resource area.
- Several players enter from different directions.
- A player inspects you and then disappears.
- A valuable node remains untouched beside a major route.
Do not wait for the attack to begin. Mount and reposition when the situation becomes suspicious.
Common Albion Online Gathering Mistakes
- Following permanent best-zone lists: Published locations quickly become crowded.
- Leveling every profession at once: Progress becomes slow across all gathering lines.
- Using a Transport Ox in dangerous solo routes: Losing the mount may leave you overloaded.
- Gathering without a pie: You lose useful yield and carrying capacity.
- Gathering far from your mount: Remounting becomes much slower.
- Ignoring market prices: A profitable resource can become weak after demand changes.
- Gathering until completely overloaded: Escaping becomes much harder.
- Using expensive gear too early: Premium equipment does not guarantee survival.
- Using every escape ability at once: One purge or control effect can stop the full escape.
- Fighting gankers: Remaining in combat delays your escape.
- Chasing every enchanted node: Valuable nodes may be exposed or used as bait.
- Assuming gathered materials are free: They still have a market value.
Albion Online Gathering FAQ
What is the best gathering profession in Albion Online in 2026?
There is no permanent best profession. Wood and fiber are easy for beginners, while hide and ore often have broad crafting demand. Choose according to current prices, competition, biome access, and specialization.
What is the most profitable resource to gather?
The most profitable resource changes with market prices, enchantment availability, route competition, and player demand. Compare current prices and measure profit according to materials successfully banked.
What is the best gathering build in Albion Online?
Use the matching gathering set, an appropriate tool, Pork Pie, a mobility weapon such as Double-Bladed Staff or Bloodletter, an escape potion, and a mount you can afford to replace.
What is the best gathering mount?
Transport Oxen are useful in safe zones. Giant Stags provide an affordable balance for newer gatherers, while Moose, Wild Boars, Salamanders, and similar mounts suit experienced players with larger budgets.
Where are the best gathering spots?
The best spot is normally a quiet zone in the correct biome with full nodes, several exits, and limited portal or hideout traffic. Avoid relying on a permanent named-zone recommendation.
How do I gather safely in the Black Zone?
Use replaceable equipment, stay near your mount, avoid chokepoints, react immediately to nameplates, preserve separate escape abilities, and bank before becoming overloaded.
Is stone gathering profitable?
Stone can be profitable when enchanted nodes are available, competition is low, and construction demand is strong. Compare raw stone and refined block prices before gathering a large amount.
Should I sell raw resources or refine them?
Sell raw resources for immediate, simple profit. Refine when specialization, focus, city bonuses, returned resources, and refined-material prices produce a better margin after fees and transport.
Conclusion
This Albion Online gathering guide 2026 shows why successful gathering cannot be reduced to one resource, mount, or Black Zone.
Choose one profession, gather in its primary biome, use the matching equipment, and develop specialization before spreading progression across other resources. Check current market prices, prioritize valuable nodes, and calculate profit according to what you successfully bring home.
Use gathering food and a matching backpack in safe zones. In lethal zones, prioritize mobility, awareness, mount management, route planning, and equipment that you can replace.
Bank before becoming overloaded, avoid fighting over nodes, and leave any route that becomes crowded or suspicious.
For more gathering advice, economy strategies, weapon builds, and progression guides, explore the Albion Online guides on Heaven Guardian.